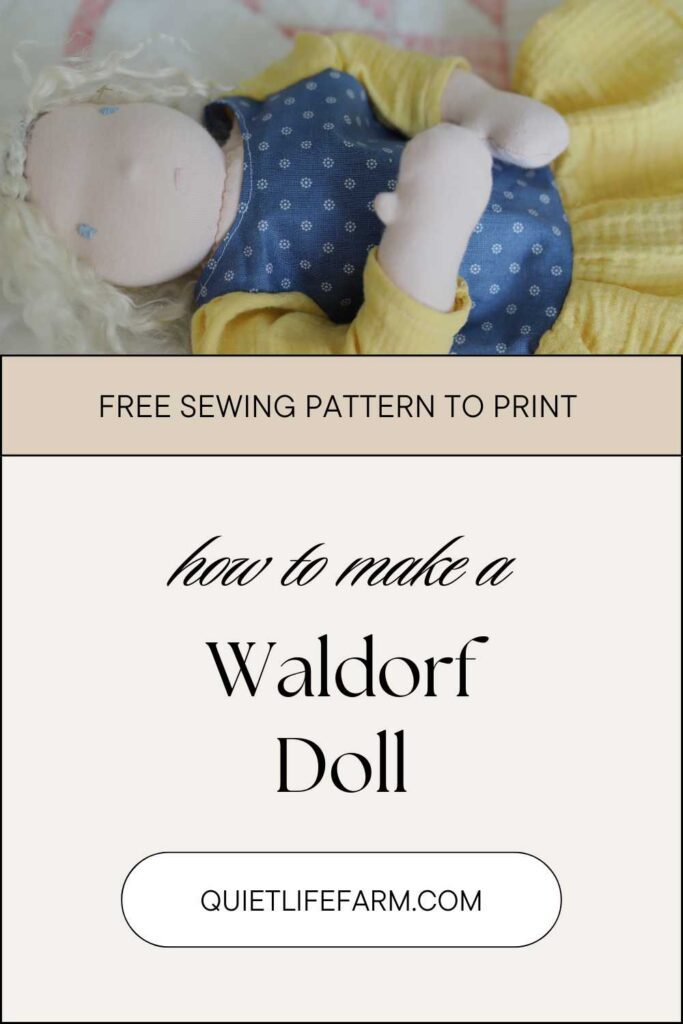
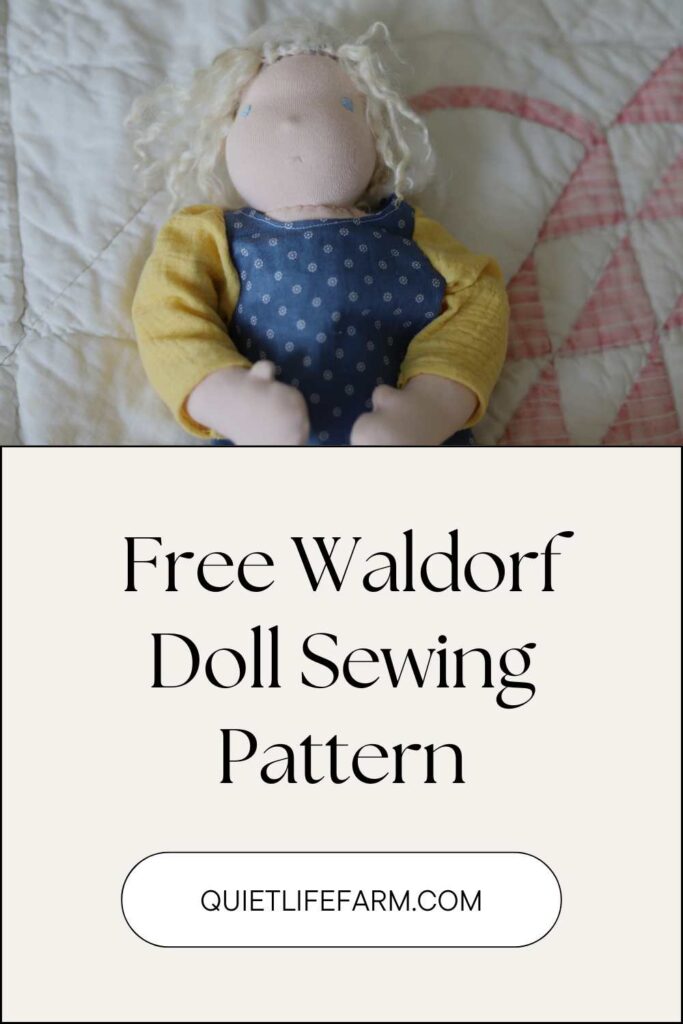
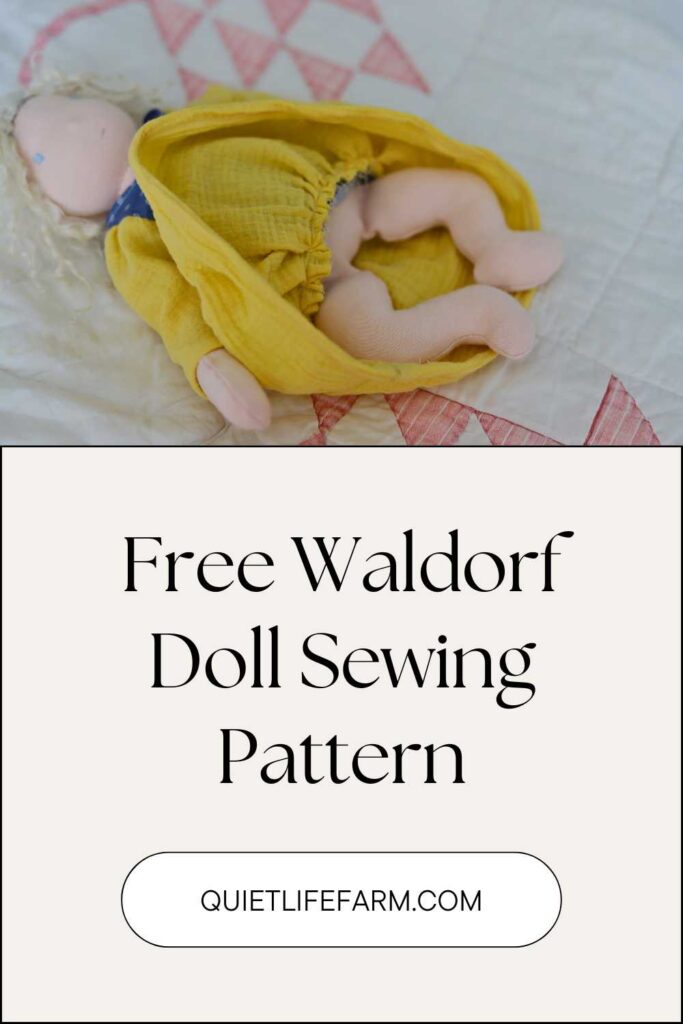
Free Waldorf Baby Doll Sewing Pattern
Here’s a free printable sewing pattern for this Waldorf baby doll!
Disclaimer: As an Amazon Associate, I earn from qualifying purchases.
Below, you can print out a free sewing pattern to make this Waldorf baby doll!
The pattern is totally free to print.
Print the pattern, then come on back to the blog to see how to make this Waldorf doll, step-by-step!
If you prefer, you can also watch me make this doll on YouTube!
Supply List
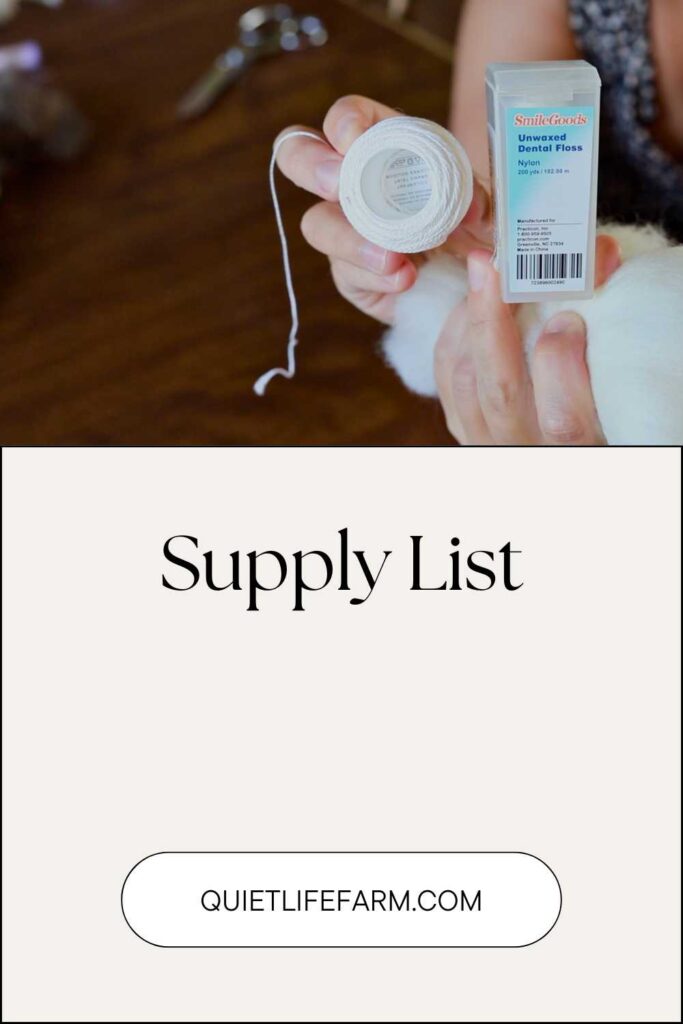
Here’s what you’ll need to make this doll!
- Cotton Interlock Fabric
- Sewing Machine
- Hand sewing needle and thread
- Thread that matches the body, thread that matches the hair, and thread in the color that you want the eyes and mouth
- Unwaxed Dental Floss or strong dollmaking craft thread
- Wool
- Roving
- Beeswax Crayon for blush
- Cotton fabric for the clothing
- Yarn for weft
- Crochet hook for making weft (preferred method, but optional; see tutorial)
- Yarn or wool locks for hair
- 1/4″ width elastic for the clothes
- FREE printable pattern (get yours below!)
Helpful Tips
Here are some helpful tips to review before we get started!
- Stuff everything FIRMLY with wool! (and stop stuffing with wool as directed!)
- Use a ladder stitch for attaching EVERYTHING!
- When sewing by hand, make a firm knot at the end of your seam, keep the tail end of your thread long, and then use your needle to pull your long ends of thread to the inside of your Waldorf doll’s body. This keeps the thread neat and strong!
- DON’T cut out your fabric after tracing the pattern! You’ll be sewing FIRST!
- DON’T use your beeswax crayon directly onto your doll! Rub the crayon onto scrap fabric or wool, and then use the fabric/wool to apply the blush to your doll.
Print Your Pattern
You can print this Waldorf doll pattern for free by using the form below!
The email will be sent to your email inbox.
(If you don’t see it, check your “promotions” tab!)
After you print your pattern, come back to this blog post to see how to make your doll!
Trace, DON’T CUT!
The first thing you will want to do with your pattern pieces is to trace them onto cotton interlock fabric.
Cotton interlock fabric is a stretchy knit fabric used to make Waldorf dolls.
My favorite cotton interlock fabric is from Weir Crafts. You can take a look at it using this link.
Trace the piece for the head on the fold of your fabric.
Remember — you’ll want all of your pieces to stretch WIDER, not taller.
Trace your pieces, but do NOT cut them out!
When making a Waldorf doll, you will sew directly onto your traced lines.
There is no seam allowance on your pattern pieces.
Be sure to leave the marked dotted edges open!
Cut AFTER you sew!
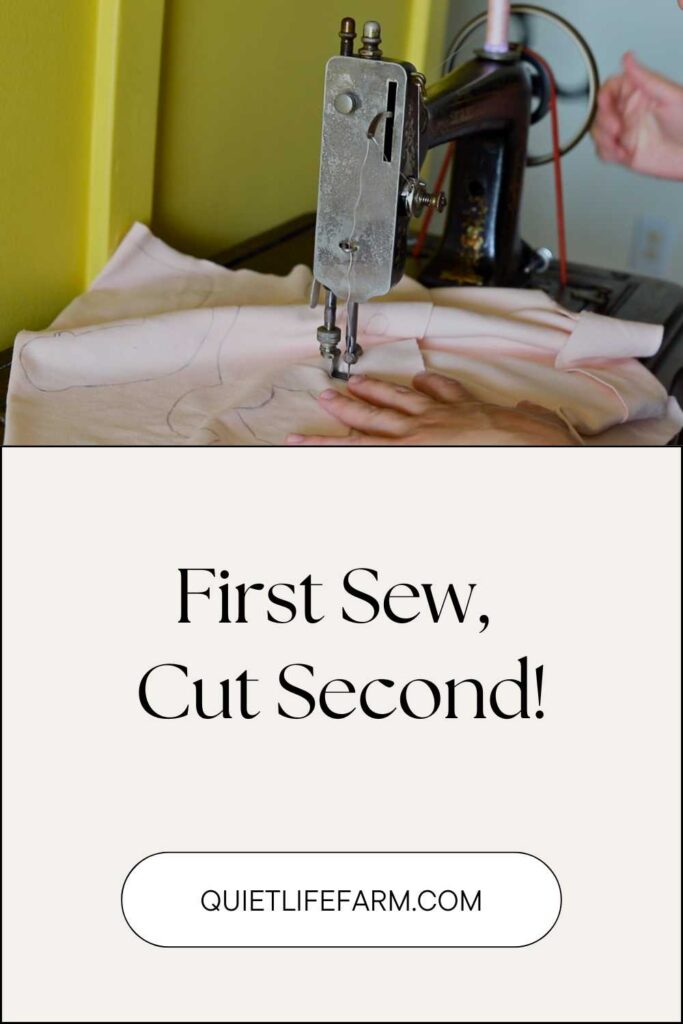
AFTER you sew your pieces, you’ll cut out your pattern pieces, leaving a decent seam allowance around your seams.
Leave a seam allowance around your open portions of the pattern, too (the parts marked with a dotted line on your paper templates).
1/4″ – 1/2″ is a good amount of seam allowance. It doesn’t have to be too specific, just don’t cut too close to your stitches!
Clip around any curves into your seam allowance so that the fabric does not bunch up when you turn it right side out.
Turn everything right side out.
Stuff With Wool
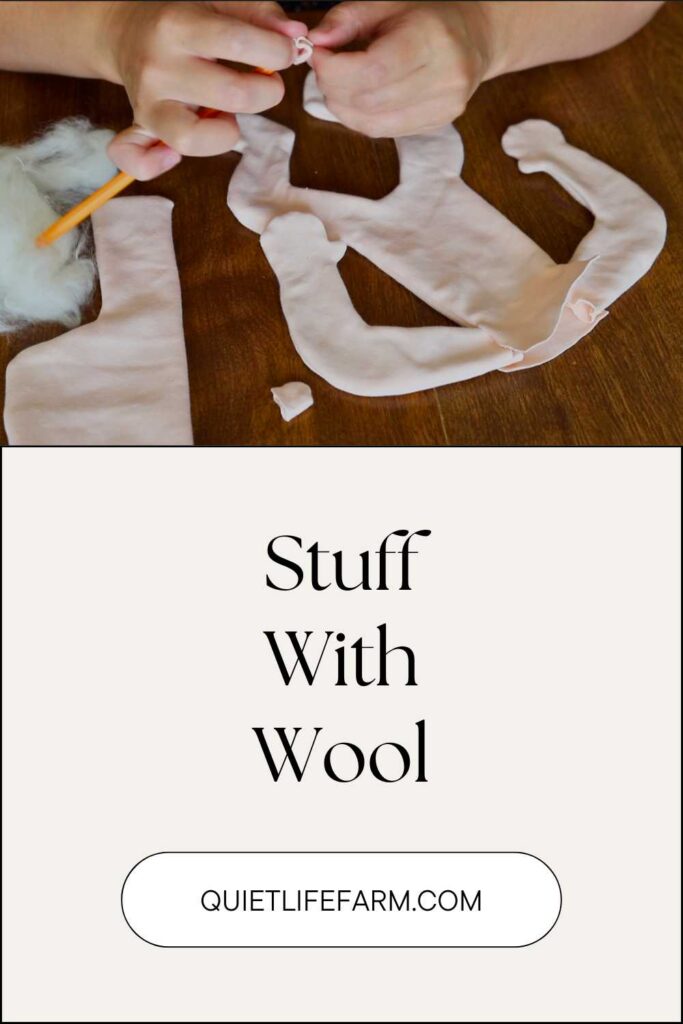
Waldorf dolls are made with all natural materials.
Wool is used to stuff Waldorf dolls.
The wool adds a lovely natural weight, and holds onto warmth well.
This is the wool I used to buy for Waldorf dolls before I had my own sheep.
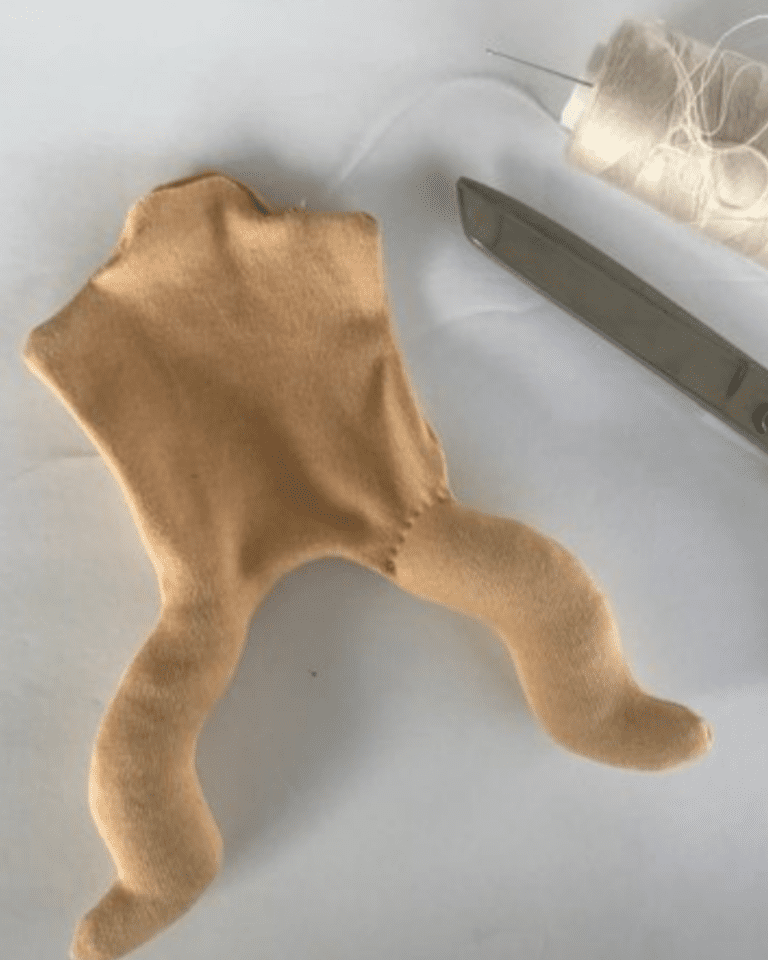
Stuff all of your doll FIRMLY with wool, EXCEPT for the HEAD.
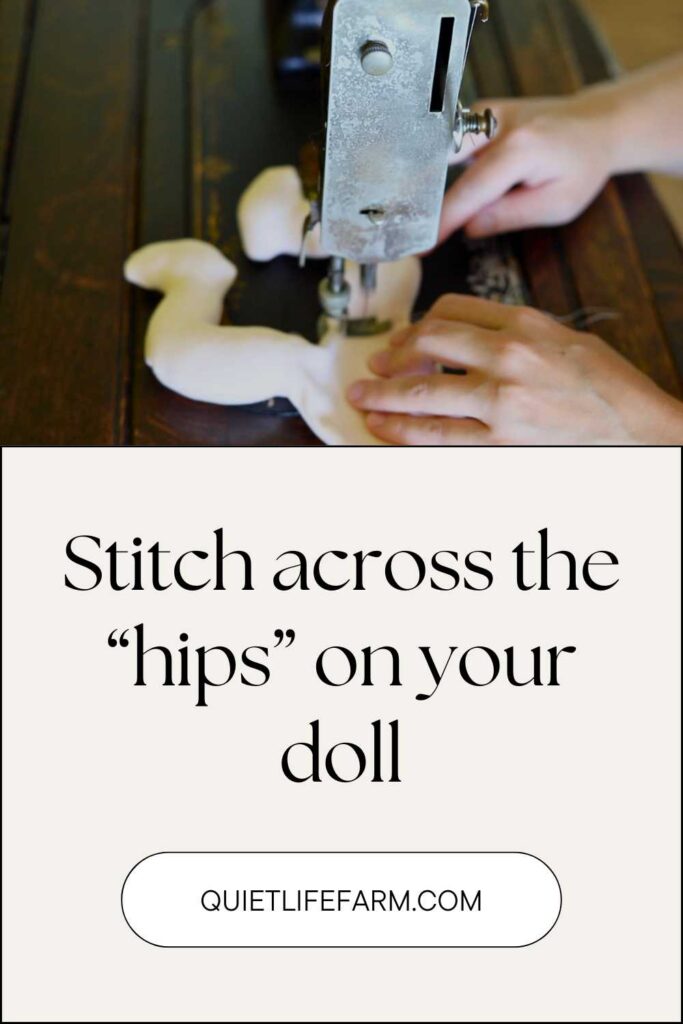
Leave a little bit of “emptiness” at the hip joints of your doll where the tops of the legs meet the bottom of the body, and stitch through them. This gives mobility to the legs.

You’ll want to stuff the arms firmly until you reach the “fill line.” Then, sew a line of stitches across your fill line. This gives mobility to the arms.
Creating the Inner Head
A Waldorf doll has an inner head that is very firm and creates that classic Waldorf doll style look.
The head is made with cotton tubular gauze, wool, unwaxed dental floss, and a hand sewing needle/thread.
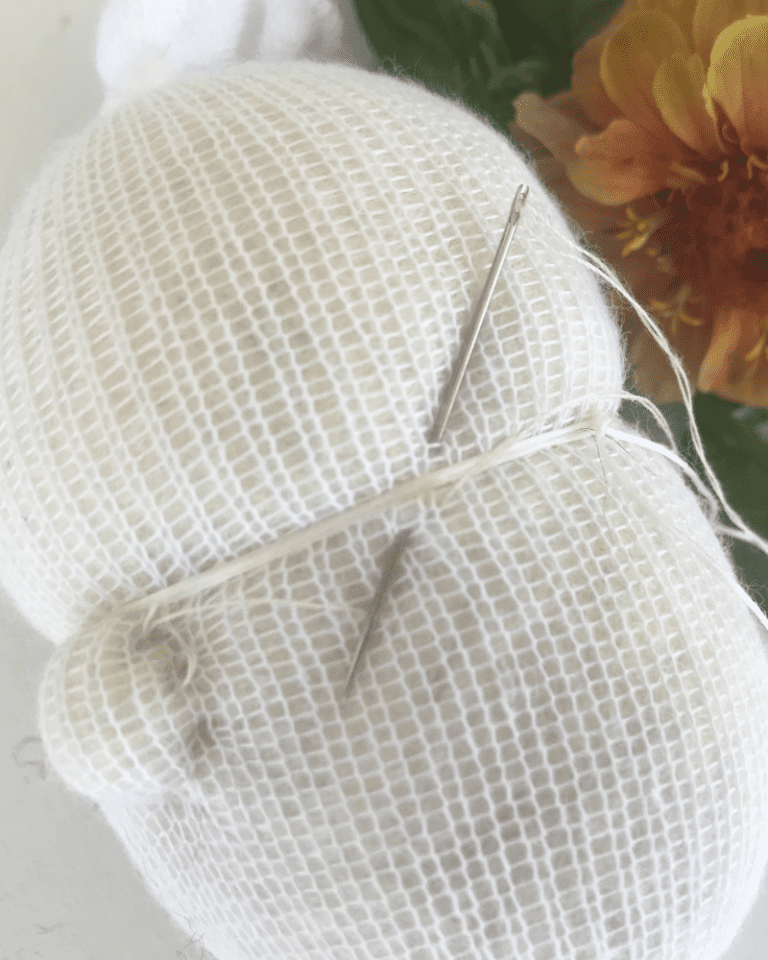
First, you’ll want to create a “core” — a very firm round ball of wool that is smaller than your desired head size. for this doll, about 7″.
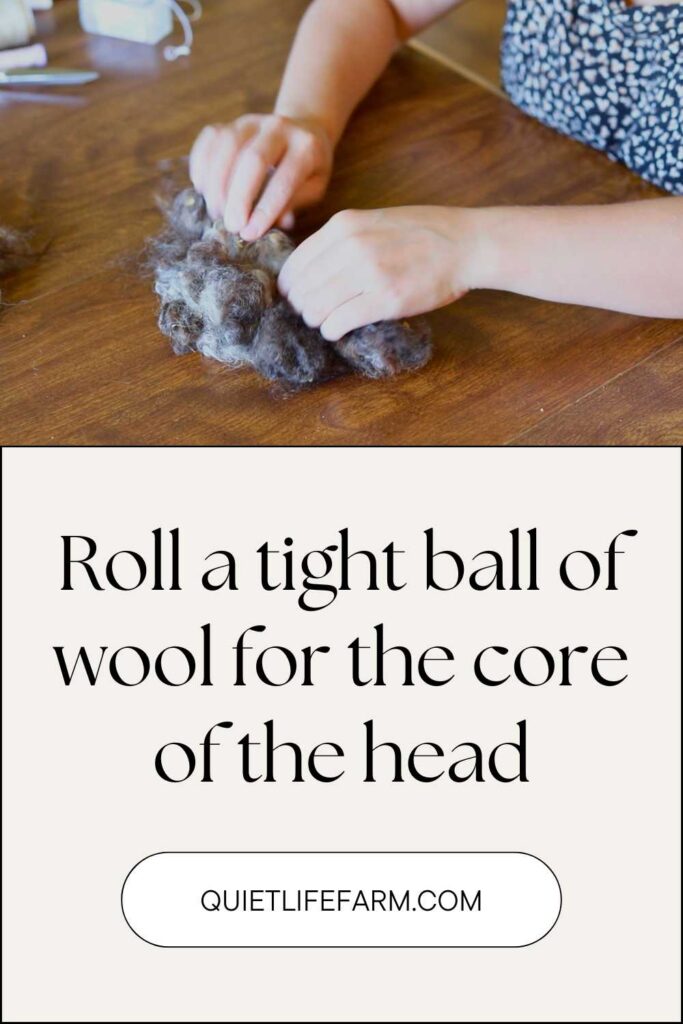
Then, firmly wrap strips of wool or wool roving around your doll until the head measures 9″. Next, take 20″ of tubular gauze.

Twist the gauze in the center and pull one end over the other, making the knot now one end of the gauze, and both openings of the tube at the other end.
Now you’ll have something that resembles a sort of stretchy bag. The double layer of gauze helps add a smooth stability to the inner head.
Put your firm ball of wool into the tubular gauze.

Tightly tie a neck with the unwaxed dental floss.
Tie the bottom of the neck closed.

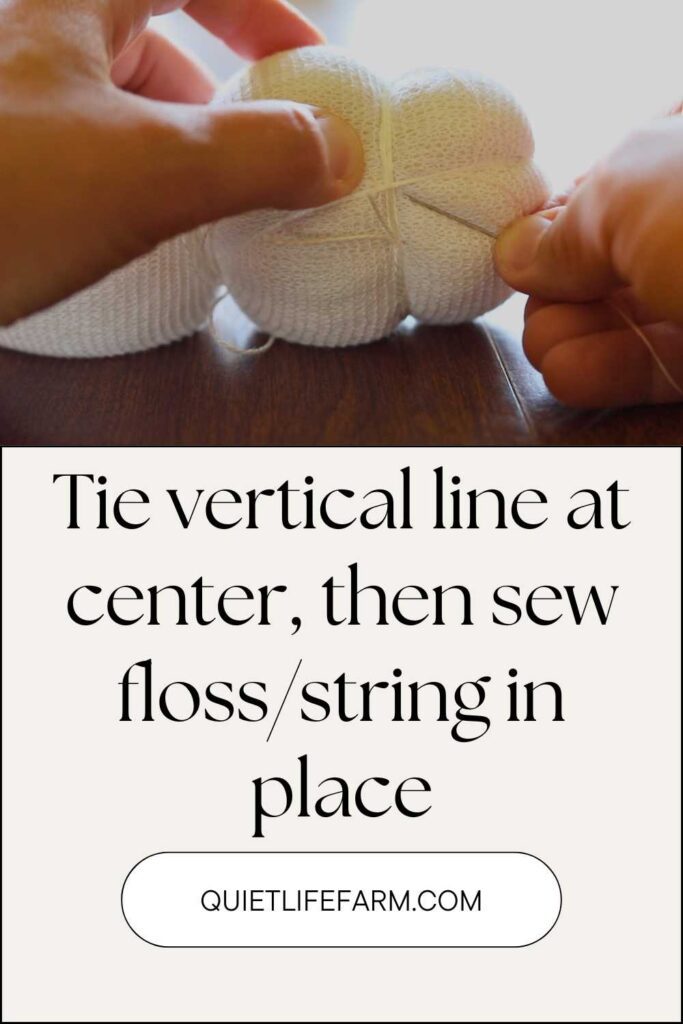
Firmly tie a long piece of unwaxed dental floss around slightly higher than the center of the head to create an eyeline. It’s best to wrap the floss around several times.

Tie a second piece of floss vertically in the center of the head to separate the front of the head from the back of the head.
Sew the floss into place with a hand sewing needle and thread. If you need to adjust where the eyeline is before sewing it into place, a crochet hook is a helpful tool to wiggle the floss where it needs to go.
Further Shaping of the Inner Head
Next, you’ll want to make a little bump for the nose, right below the eyeline.
Use a hand sewing needle and thread to sew around a circle where you want your nose to be, picking up bits of wool from inside the inner head and pulling them forward.

Pull tightly, knot, and use your needle to pull the long threads inside the head so that they are unlikely to unknot themselves over time.
Place the inner head into your cotton interlock head piece, placing the neck at the bottom.
Pull the cotton fabric up around the head, ensuring there are no wrinkles, and sew it into place at the top of the head.
It’s okay if the top of the head does not look very pretty — it seldom does. Don’t worry! It will be covered up by hair!
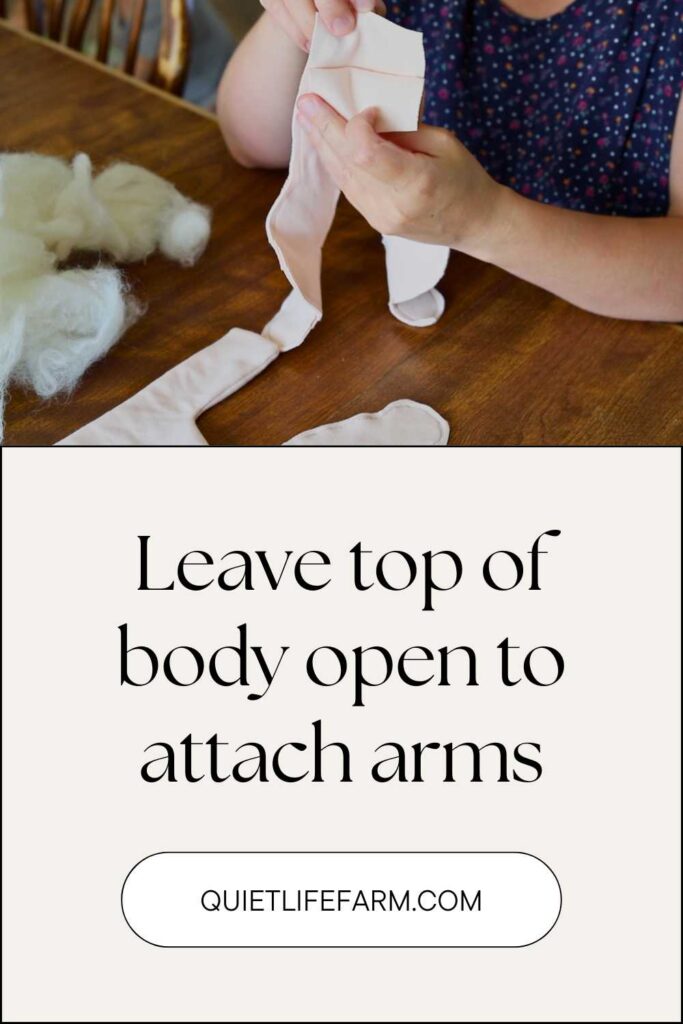
Attach the Head and Arms to the Body
Next, you’ll use a hand sewing needle, thread, and a ladder stitch to sew the head and arms to the body.
Fold in all the raw edges on the top of the body when attaching the arms and the head.
First, attach the arms. Attach them as low as they will go on the opening of the body.
After the arms are attached to your doll (again, use a ladder stitch!), go ahead and attach the head.
You’ll place the neck of the head all the way down into the body. You may have to move some wool around inside the body to get it to fit.

Use a ladder stitch to sew the head into place.
The Hair
To make the hair, you’ll want to make a little cap that you can attach the hair onto.

You can do this two ways: by crocheting, or by braiding some yarn.
If you know how to crochet, use this tutorial on my blog to make a cap for the doll. You’ll want to continue making it until it is large enough to fit over your doll’s head.
If you DON’T know how to crochet, don’t worry! You can make a long braid out of yarn (use a color that matches the hair!) and sew it in a spiral on the top of the head. I did this for my Waldorf mermaid doll. You can view that post here.
After you sew the cap onto your doll’s head by using one of the methods above, you’ll want to either loop yarn through the cap to make doll hair, or sew a woolly lock weft to the cap.
For wool locks, I basically sewed a long line of wool locks through my sewing machine, and then sewed them in a spiral onto the head.
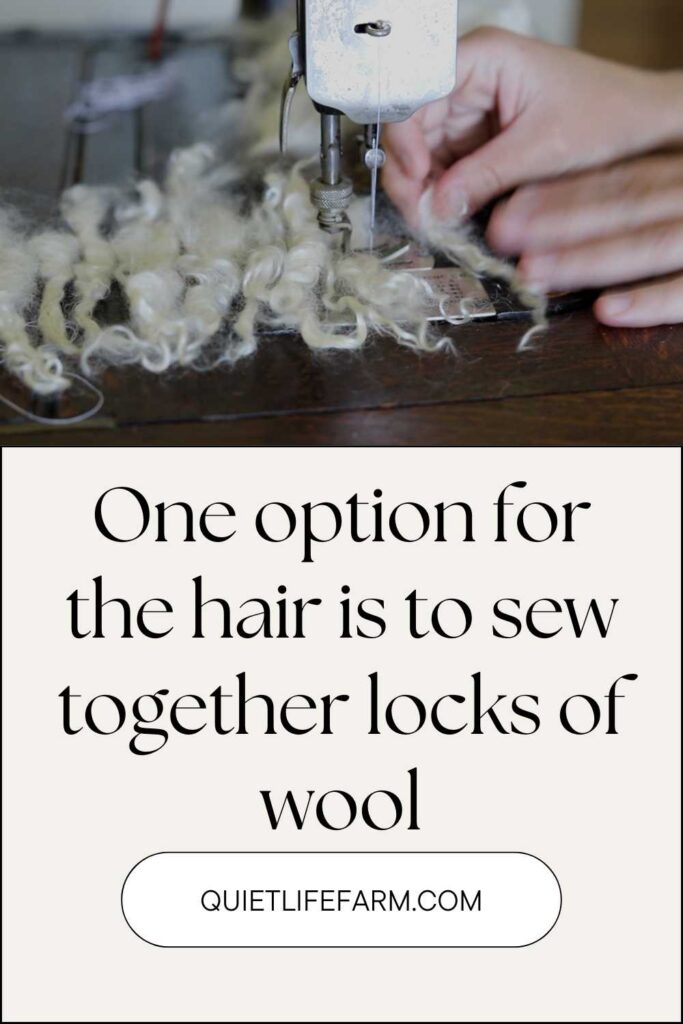
If you want more information on how to make wool hair like I did for this doll, please take a look at this tutorial on my blog for more details!
Finishing Touches
Now that the hair has been attached, you can sew on your ears.
Fold in the raw edges of your ears (remember to stuff the ears with wool!), and use a ladder stitch to firmly sew them into place on your doll.
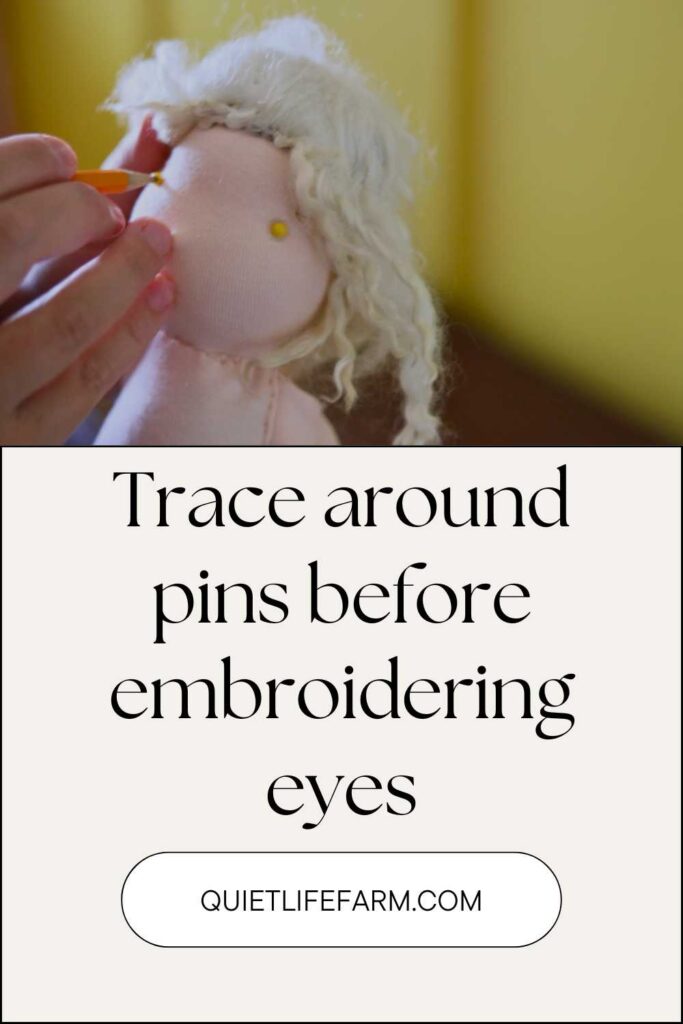
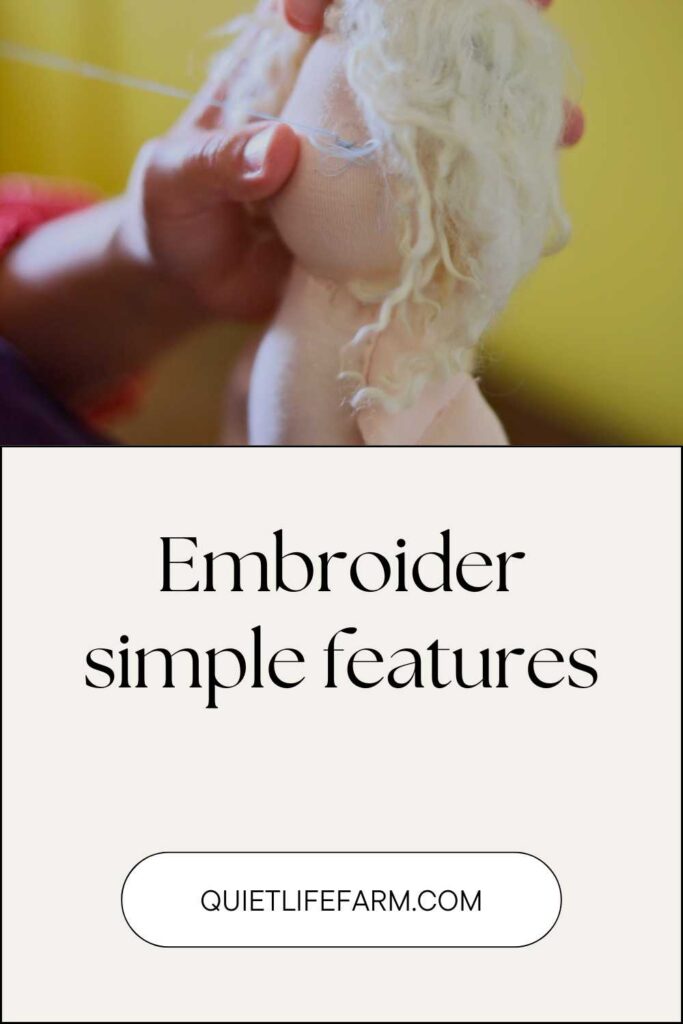
Embroider eyes and a tiny mouth onto your doll. It’s helpful to use pins to decide where you want the facial features to go.
For the eyes, I find it’s helpful to trace around a straight pin to make a perfect circle exactly where you want the eye to go.
Traditionally, the features on a Waldorf doll’s face are kept very simple, or omitted all together. The thought behind this is that your child can then imagine whatever emotions they think their doll is feeling — often dolls are “stuck” smiling, or holding any one given impression, so simplistic facial details on Waldorf dolls makes them uniquely Waldorf!
Lastly, use a beeswax crayon to add “blush” to your doll on the cheeks, the hands, the elbows, and the knees. (and anywhere else you’d like to see some rosy red life in your doll!)
Don’t apply the beeswax crayon directly to your doll — instead, rub the crayon onto some scrap fabric or a bit of wool, and use the fabric/wool to rub the blush onto your doll. Using the crayon directly to your doll is too harsh and will make too strong of colors on your doll.
The Clothes
Let’s start with the dress for your doll.
For the bodice, use the template to cut two pieces on the fold.
Cut two pieces out for the sleeves.
I just hemmed the neckline of the bodice since it’s so tiny, but you could attach bias tape.
Sew the bodice right sides together at the shoulders.
Gather the sleeves, and sew to the arm holes.

Hem the sleeves.

Place the shirt right sides together, and sew the bottom of the arms and sides of the bodice.

Cut out a rectangle that measures 5″x24″, and sew it in half, short sides together.
Gather the skirt, and attach it to the bodice.

Hem the bottom of the skirt.
Happy sewing!


This is such a beautiful cuddly doll. I can’t wait to try out the pattern.
Thank you for your sweet comment, Sandra! I hope you enjoy making your doll!
I love these dolls and am anxious to make one. I will get the pattern ready and gather all the fixings and give it a try. thanks for the detailed video.
Thank you so much for your kind words! I hope you have a wonderful time making your doll!
I cannot find the doll pattern nor do I know where to look for promotions. Can you please provide more specific instructions?
Thank you so much
Martha
Hello, Martha!
There is a form on the page to have the pattern sent right to your email, but I went ahead and sent it to you directly! (sometimes the patterns are sent to an email inbox marked as “promotions inbox”, most common for gmail. It’s just how gmail automatically organizes emails, but sometimes it makes it difficult to find the emails. Your email might have just got straight to your normal inbox! If you don’t see it, check the left hand side of your email and switch from your “inbox” to “promotions”)
Can I use comforel to stuff my doll? I can wait to get started!! Thanks
You can — traditionally Waldorf dolls are made with wool, but you absolutely can! Do not use the ones labeled things such as “down alternative” — you will want the kind that is as dense as possible to try and imitate the stiffer/heavier/denser effects of wool! Happy sewing!
I am trying to access your free eater egg pattern and some of your toy patterns but I can’t figure it out. Any help is greatly appreciated. Thanks
I’m happy to help! 💛
My free patterns aren’t downloaded directly from the blog — they’re sent to you by email after you fill out the form on each pattern page. Often the forms are titled something along the lines of “Get your free sewing pattern!”
After filling out the form, here’s what to check next:
1️⃣ Look for an email from Quiet Life Farm in your inbox
2️⃣ If you don’t see it, please check your Promotions, Updates, or Spam folder — sometimes it lands there
3️⃣ Once you find the email, it will include a link to the pattern that you can open and print
If you still can’t find it after checking those folders, just reply to this email and let me know the email address you used to sign up — I’m always happy to resend it for you.
Thank you so much for being here and for your patience. I hope you enjoy making the patterns!
Lovely doll making. I want to make some dolls for my new granddaughter, Evelene Clare.
What a beautiful name your granddaughter has! And how blessed she is to have a beautiful grandmother making her a handmade doll!
Waldorf pattern
I’m happy to help! 💛
My free patterns aren’t downloaded directly from the blog — they’re sent to you by email after you fill out the form on the pattern page.
Here’s what to check next:
1️⃣ Look for an email from Quiet Life Farm in your inbox
2️⃣ If you don’t see it, please check your Promotions or Updates folder — sometimes it lands there
3️⃣ Once you find the email, it will include a link to the pattern that you can open and print
Thank you so much for being here and for your patience. I hope you enjoy making the pattern!
Warmly,
Quiet Life Farm
What is the height of this doll?
About 13″ tall 💗
Thank you!!
Thank you for your kind comment! I’m so glad you enjoyed it!
I am so excited. I have used one other pattern for a cloth doll and still working on it. I am very excited that you seem to have all the clothing, instructions, face, etc. etc. 🙂
I have not been able to find the BLOG. I have the pattern and will trace it. I will watch the video, but written instructions are a good addition for me. THANK YOU!!!!!!!!!!!!!!!!
Thank you, Patricia! I am so glad you’re enjoying dollmaking! Happy sewing!