13″ Rag Doll: FREE Sewing Pattern!
Here’s how to make a classic rag doll using my FREE printable pattern!

As an Amazon Affiliate, I earn from qualifying purchases.
Keep reading to see how to make this classic-style rag doll using my FREE sewing pattern that can be printed at the bottom of this page!
Below, you will find instructions for how to make this doll, with plenty of pictures to help along the way!
You can also watch me make this doll in my cozy YouTube video.
Let’s get right to it!
Supply List
To make this doll, you will need:
- Fabric for the body (I used leftover flannel from an old sheet)
- A sewing machine
- A hand sewing needle and thread
- Colored thread to embroider the face
- Wool to stuff your doll with (or the fiberfill of your choice)
- Scissors
- A pencil
- A Tapestry needle and yarn for the hair (I used “Wonderfluff”)
- Your free printable pattern (I’ve put it at the bottom of this page!)
Cut out your pattern pieces
The first thing you need to do is print out your pattern.
The template for the body prints out as 4 separate pieces. Cut these pieces out and tape them together (there are guides on the template, don’t worry!)
The bodice for the dress on this doll prints out as 2 separate pieces. Cut these out, too — and tape them together (there are also guides on the paper for this! Easy peasy!)
There is no pattern piece for the skirt of the dress, because the skirt is so easy to make (no need to waste your printer paper and ink for it!).

Just cut a rectangle for the skirt to whatever your preference is for length. I cut my rectangle to be 28″ wide, and 11″ long. (note: the length of the skirt I made is longer than the feet, so if you want a shorter dress, make your doll and then measure the skirt against the doll to decide on how long you want it to be!)
Same goes for the bandana — no paper pattern piece, just cut a square that’s 6 1/2″ by 6 1/2″ (I used a leftover quilt square from another project that was this size).

Sew the Body and the Bodice
The body and the bodice are made in the same way.
Just trace the pattern pieces over two layers of fabric that are right sides together.

Sew directly on these traced lines — right through the two layers of fabric.
You’re going to want to leave a small portion OPEN to be able to turn these pieces right side out. Don’t sew on one side of the doll, and don’t sew on a portion of the bottom of the bodice. (it’s all marked on your paper pattern!)

After you sew over your traced lines, cut out your bodice and body.
Leave a seam allowance around your seams. (around your open spaces, too!)


Then, turn everything right side out.
Tuck the raw edge of your bodice to the inside of the dress. Don’t sew closed quite yet — you’ll sew this closed when you sew the skirt to the bodice, all in one seam — it looks much neater this way.
I dyed my white fabric with some coffee and tea to make this doll. It was so much fun, and gave it such a unique look! You can learn more about how I did that by reading this blog post.

Stuff your doll
Stuff your doll with wool.
You don’t have to use wool. I prefer wool because of the weight it gives, and the warmth it holds.
After you stuff your doll, hand sew the open side of your doll closed.

Mark on the shoulders, hips, elbows, and knees (marked by a dotted line on your paper template). Sew across these portions to make nice flexible “joints” for your doll.


Finish the dress
To finish the dress, cut a skirt piece and hem three sides of it by folding the fabric over twice.
Gather the top edge of your skirt with a wide basting stitch. Pull the basting stitch to gather your skirt until it is the same width of your bodice.


Lay the bodice on top of the gathered edge of the skirt. Sew into place.

Sewing the bodice to the skirt will also sew the remaining open edge of the bodice closed, so make sure you’ve folded that remaining raw edge to the inside of the bodice!
Hand sew the shoulders of the dress together, right on the edge of the shoulders.

Lastly, sew some sort of closure onto the back of the dress. This can be buttons, a zipper, snaps…. I chose Velcro!

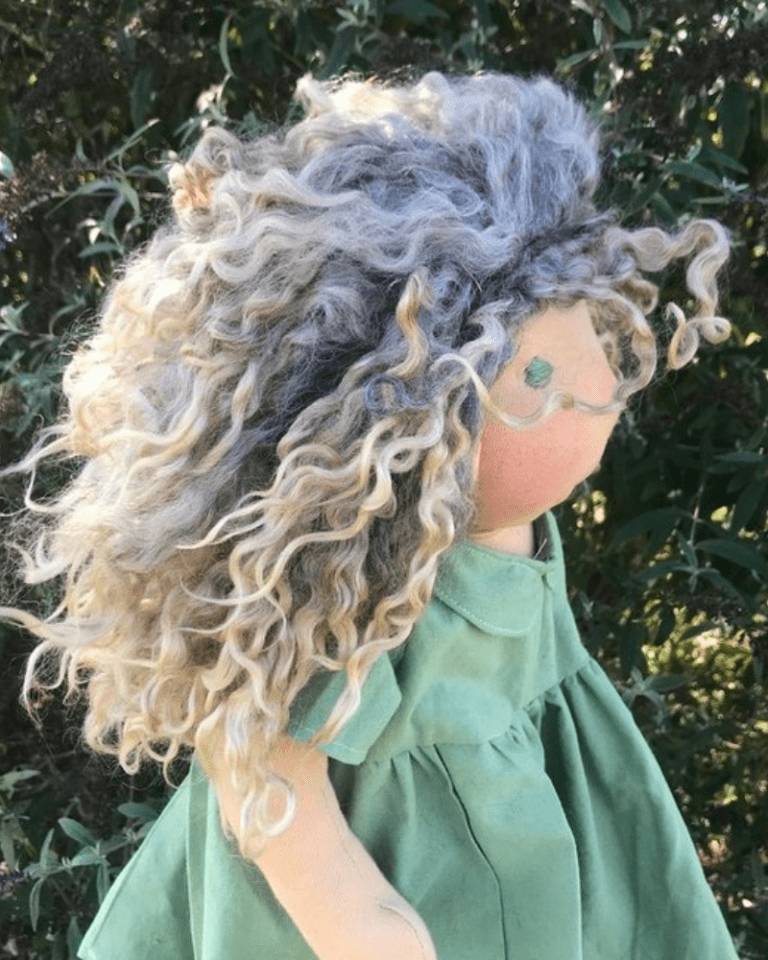
Sew some hair onto your doll
For the hair on this doll, I used a half-used-up skein of Wonderfluff yarn by Knit Picks.
I literally just slapped the skein of yarn against the back of my doll’s head, and used a long piece of yarn from the same skein and a tapestry needle to sew it into place.

Sew ALL over the skein of yarn, not just around the face — otherwise it will become a tangled mess over time.

You want to sew the yarn into place lots and lots, stitches all over!
Ater you sew on the hair, hem your 6 1/2″ x 6 1/2″ square (fold over the raw edges twice), fold it in half, and sew into place as a bandana (totally optional, but I thought she needed a bandana!).

I used a regular needle and thread to sew on the bandana.
Sew a face onto your doll
Sew a face onto your doll by first lightly tracing the facial features with a pencil.
This way, if you don’t like something about the face, you can erase it and retry the sewing process.

I used a regular needle and thread to sew on the face.
Just make little stitches for the straight lines, and stitches all going in the same direction for “thick” parts (like the eyes).

Knot using a French knot, then pull all ends of the thread inside the doll to make them strong, neat, and hidden.


Get your free pattern here!
Here’s where you can have this free pattern sent to your email inbox!
Get it below!
Happy sewing!


Thank you for the free pattern, she’s adorable! I haven’t
Made a doll in many years!
Thank you for reaching out, Alfreda! I appreciate your kindness! Have a wonderful time sewing! Making dolls is such a special experience!
Thank you, I have an obsession with petite rag dolls, and your blog is perfect. The patterns are quick and easy so the instant gratification is great.
Please keep up your beautiful efforts. I appreciate you.
Thank you so much for saying that! That is so sweet of you!
I love your videos.
That is so kind of you to say, thank you!
I can hardly wait for your pattern, going on 80 years I hope I’ll finish it. I’d like to donate it for a Church raffle.
Thank you, Rose! What a blessing, I know it will be such a big hit at your raffle!
hi doll looks great. the dress pattern . can you send another link?
I’ll send you the full pattern with a complete wardrobe now!
Such a sweet doll I would love the free pattern
Thank you for your kindness! I’ve emailed you the free pattern! (check your promotions inbox — sometimes my free patterns end up there!)