Boho Dress FREE PDF SEWING PATTERN Loose Maternity Nursing
This Boho Dress Pattern has a loose fit around the waist and a button down front bodice, making it PERFECT for maternity and nursing seasons of life! Best of all, the PDF pattern is TOTALLY free to print and use!

I’ve been pregnant a lot over the last 10-ish years.
During my pregnancies, I like clothing to be very loose fitting around my waist (hello, braxton hicks contractions!).
I also like for my maternity clothes to be easy to nurse in, as I stay in my maternity clothes for the first few months of postpartum healing, so it’s great when maternity clothes can double up on being functional for both!
Lastly, who doesn’t love to feel beautiful in their pregnancies? Clothing that fits well and caters perfectly to your own personal style can put such a light step into your pregnancy! (which is especially nice if your feet are swollen!)
Anyone who has shopped for maternity clothes knows that they are both PRICEY, and limited in what options you can choose from. Especially if you live in a rural area, you can largely forget about even being able to find any to purchase in a store where you can try them on first! When I was pregnant with my first baby, I went to SO MANY STORES only to be told that they didn’t even have a maternity section! I had to buy all my clothes online, which really didn’t work very well for me since I couldn’t try them on!
Here’s my favorite solution to all of this — make your own maternity clothes, using this free printable pattern I drew up by hand, just for YOU!
I just want other mamas to feel comfortable and loved in their own maternity clothes, without having to pay such a hefty price tag for either factory made clothing, or with a pricey sewing pattern!
It’s such an exciting time in your life — don’t let maternity clothes shopping bring you down!
It’s the perfect maternity summer boho dress — and if you’re pregnant, you probably want your clothing to be labeled “summer” even if you’re not going to be pregnant during the summer. Those sweaty hormone rushes are REAL!
Good news! If you’re NOT pregnant — you can totally enjoy this free pattern, too! As you’re making it, play around with the waist a little bit. You may want to gather the bottom of the bodice to bring it in and give it a beautiful, ruffled style. Or, keep it the loose fitting bohemian look! You’ll find it to be quite a comfortable piece of clothing to wear!
If you’re not pregnant, be sure to still choose your correct size for this pattern — do NOT size down, or the back measurement will be too small. Measure your armhole depth and pay close attention to the length of armholes, too! (the total armhole length is NOT the same as your arm measured all the way around — it’s just the depth, so roughly half of your arm circumference) Don’t worry — this summer dress pattern comes with a sizing guide, helping you get your perfect fit!
This is a pretty basic type of pattern. It can definitely be tackled by the home sewist! It’s okay if this is your first time making a dress! Each step-by-step instruction will help you make beautiful, one of a kind items for your wardrobe!
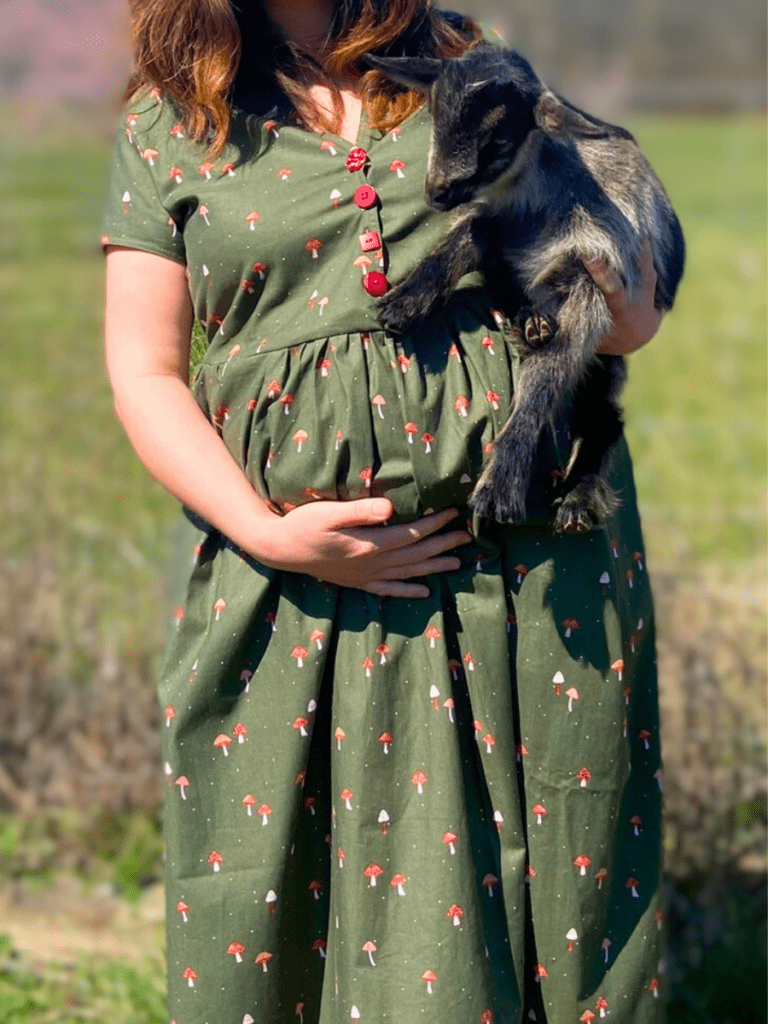
This boho dress sewing pattern comes in women’s US sizes 10 (medium) up to 24 (6XL). The dress made and photographed in this post is a size 10.
Use your home printer and regular printer paper to print your PDF sewing pattern, then follow along below with my step by step instructions to make your dress!
Whether you’re making this bohemian dress for yourself, or for someone you love — I hope you all enjoy having a beautiful dress made especially for you! Handmade pieces are a meaningful addition to any wardrobe!
Supplies Needed:
- Light to medium weight cotton or linen fabric. 7 yards maximum.
- Optional contrasting fabric to use as a lining for your bodice
- Thread that matches the color of your fabric (or a fun contrasting color! your choice!)
- 4 (or more) buttons for the front closure
- Sewing maching
- Sewing scissors
- Tape to assemble your free pattern pieces
- Measurement tape
- An iron and ironing board (I’m guilty for skipping any ironing in a sewing project, but you really shouldn’t skip it for this dress!)
Print your digital sewing pattern
Print your PDF file below — it will be sent right to your email inbox!
It’s a free instant download, and your digital file can be printed right on your home printer!
Please note — there are no pieces for the skirt portion of this pattern. The skirt is SO easy, it’s just a gathered square that is beyond easy to make. I show you how to make it without a pattern! It really and truly does need a pattern, it would just waste your printer paper and ink by printing one out!
Again, this file download is totally free! I’m just happy to make this digital item accessible to everyone!
Have your free PDF pattern sent straight to your email inbox below!
Step 1: piece together your printed pattern pieces
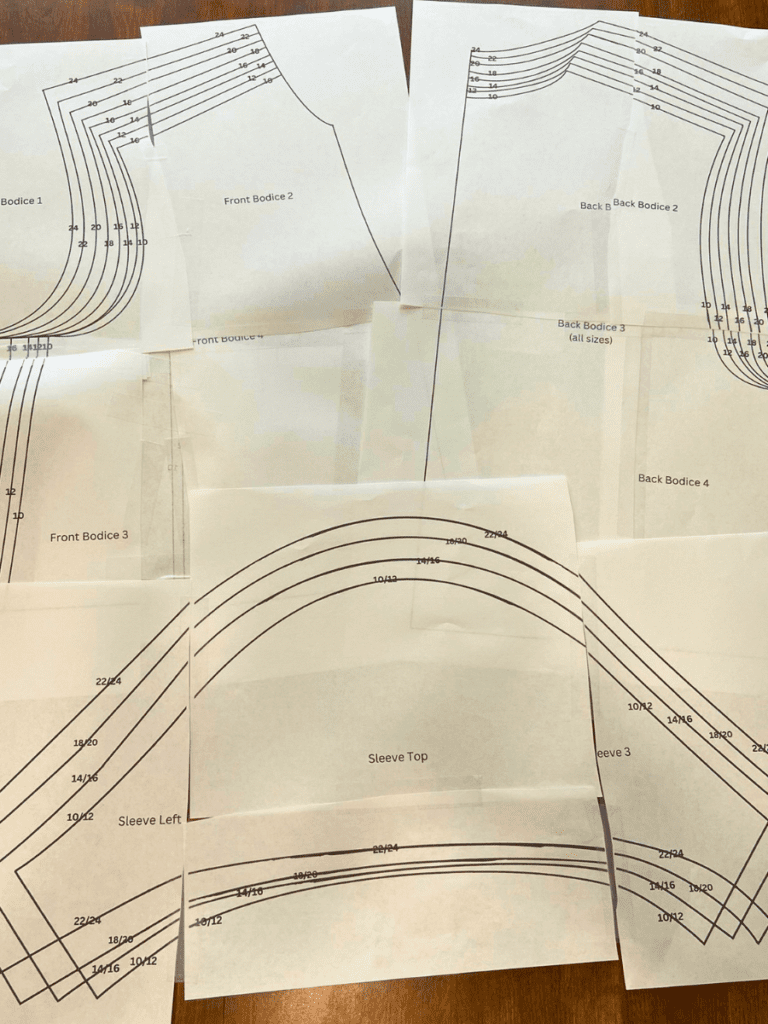
Tape together your pattern pieces, lining up the pattern lines.
Don’t worry if all the lines don’t line up absolutely perfectly — just line up the lines for YOUR size and fill in any gaps between the pieces of paper with scrap paper if you need to. It works out just fine!
For the bodice pieces, 1 and 2 will be on the top, and 3 and 4 will be on the bottom.
For the sleeve, 1 will be first, 2 will be on the middle top, 3 will be on the middle bottom, and 4 will be last.
Tape everything together as neatly as you can (again, it doesn’t have to be perfect), then cut out each of your pattern pieces to your clothing size.
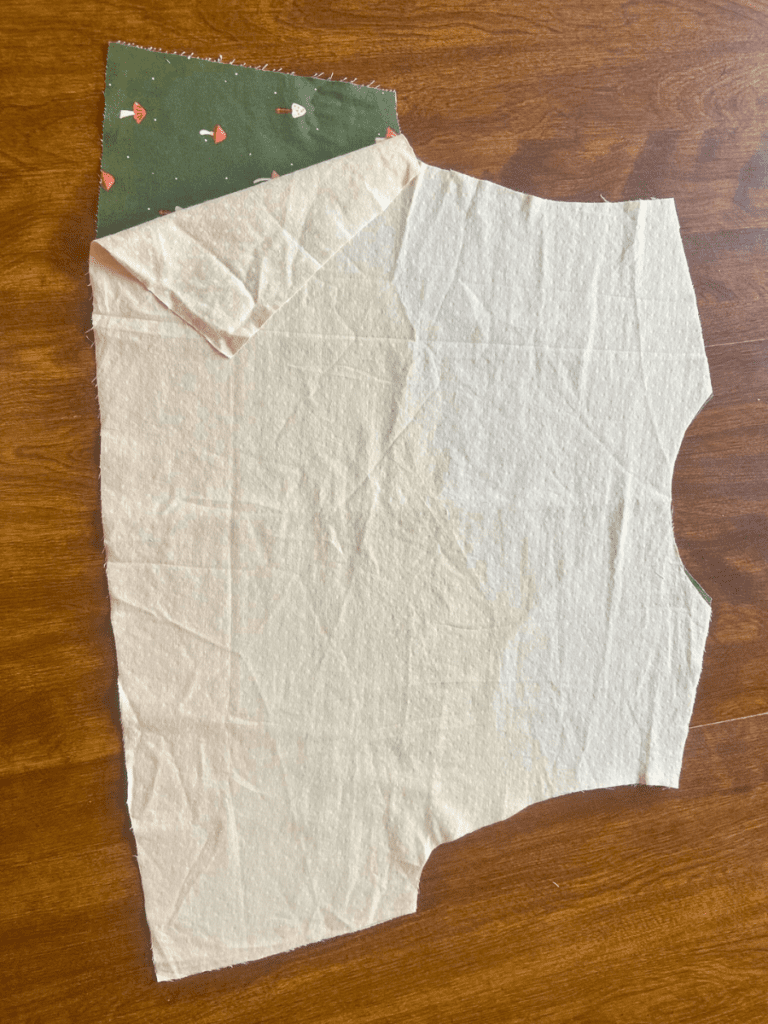
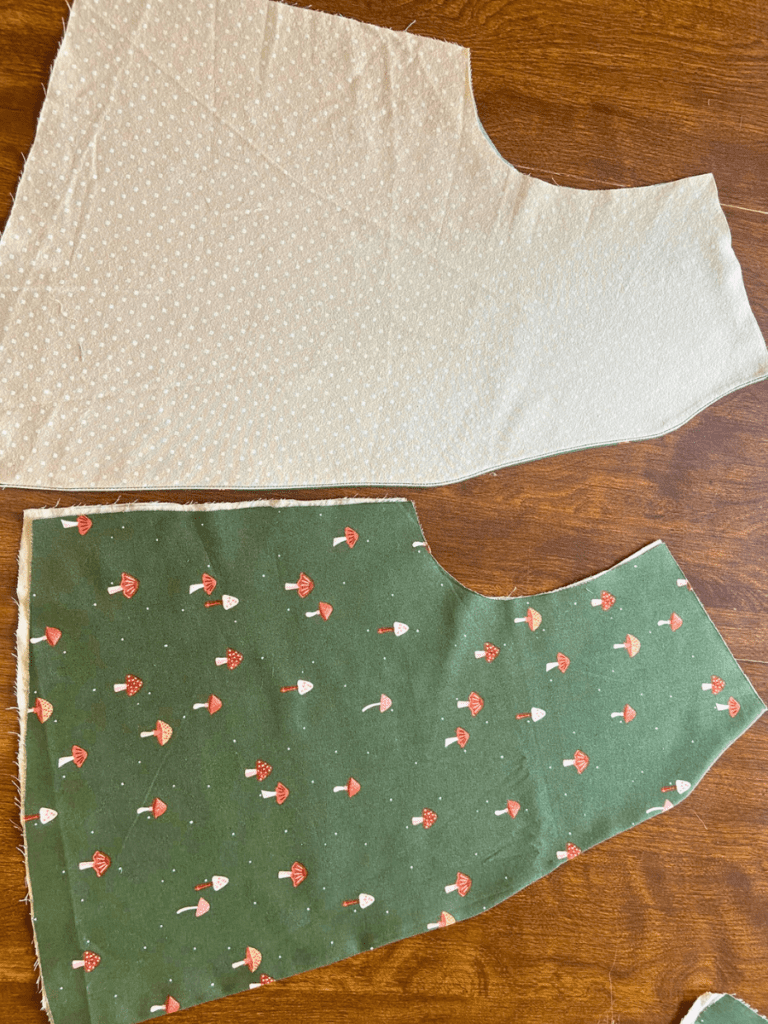
Step 2: Cut your fabric
Use your pattern to cut out your fabric pieces.
I find it’s really hard to pin printer paper down to fabric, so I just trace the patterns right onto the fabric. You can use a proper water soluble fabric pencil/pen for this, but I just use a regular #2 pencil.
I added some handy double arrows to the pattern, so if your fabric has a design, you’ll know which way is “UP” and “DOWN” on the pattern!
You’ll want a “right side” and a “wrong side” for each of your front bodice pieces (including your lining!). Fold your fabric in half, or flip your pattern upside down after cutting out a “right side up” piece. Either method will get you mirror images of each piece.
You don’t have to worry about a right and wrong side with your back bodice or sleeves.
I think it’s fun to use a contrasting/different fabric for the lining! For my lining, I actually just used an old thrifted sheet that my sister in law gave me to use for my sewing adventures! It’s a wonderfully soft fabric to have right against my body!
Cut the following of your fabric:
- 2 Front bodice in your main fabric (a right and wrong side)
- 2 Front bodice in LINING fabric (a right and wrong side)
- 1 Back bodice in your main fabric (cut on the FOLD)
- 1 Back bodice in your LINING fabric (cut on the FOLD)
- 2 Sleeves in your main fabric
- 2 Sleeves in your LINING fabric
Step 3: Sew your lining pieces to your fabric pieces
Use 1/8″ seam allowances for this portion.
Sew your lining pieces to your fabric pieces, RIGHT sides together as follows:
- Sew the Fabric to the Lining of your back bodice at the NECK only, right sides together.
- Sew the Fabric to the Lining of your front bodice pieces at the entire INNER front edge (where the “open and close” part of your dress will be), right sides together.
- Sew the Fabric to the Lining of your sleeve at the bottom of the sleeve (the long less-curved edge — if this were a long sleeve, it would be the edge at your wrist), right sides together.
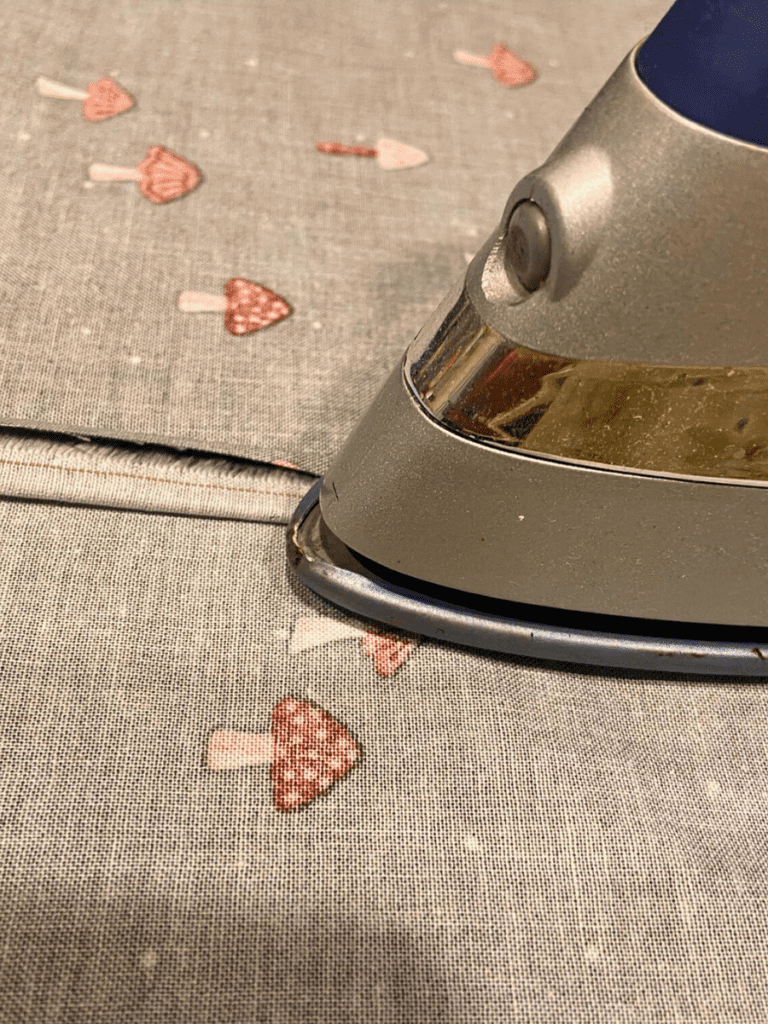
Turn everything right sides out, and iron your fabric, pressing out your seams towards your lining (see understitching how-to below!).
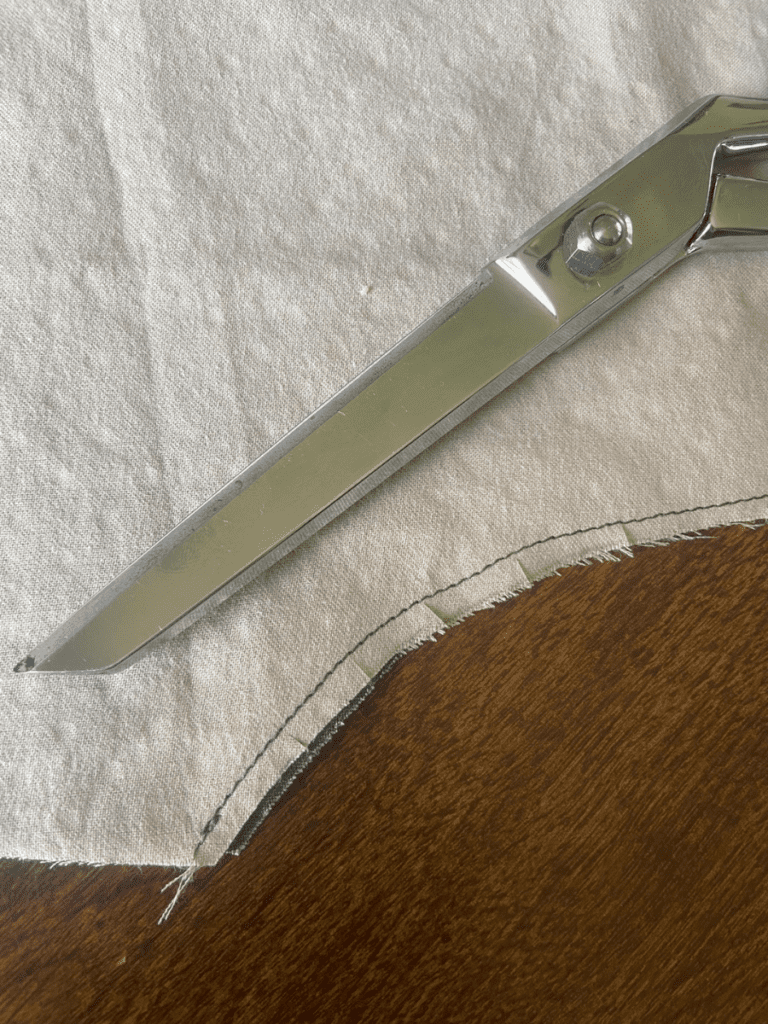
Take the time to understitch your seams. This just helps your garment to lay flat, and adds a little extra strength.
On your curved edges you’ve sewn so far, snip tiny little cuts to help with the flexibility of the fabric.
To understitch your seams, iron your seam allowance to the side, towards the lining side of your fabric.
Then, sew the seam allowance to the lining of the fabric. You can do this with your seam allowance facing UP, but I found it easier to do this with my seam allowance facing DOWN.
Repeat this for all of the seams you have made so far. Iron everything again.
Step 4: Assemble your bodice together
Next, we’ll be putting our bodice (the top part of the dress or the “shirt” of the dress) together.
For this portion, we’ll use a 1/2″ seam allowance so we can fit in some mock french seams.
Lay your back bodice flat on a table, right side up (the outer fabric, not the lining).
Lay each front bodice piece right side DOWN on your back bodice. Line them up at the SHOULDERS.
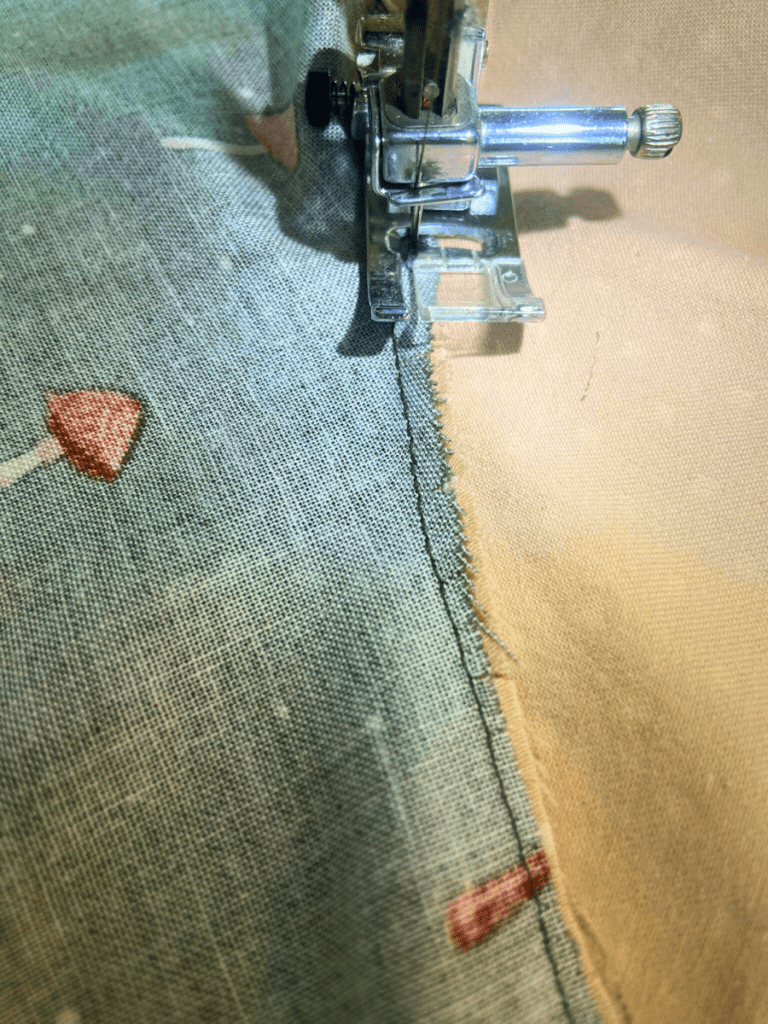
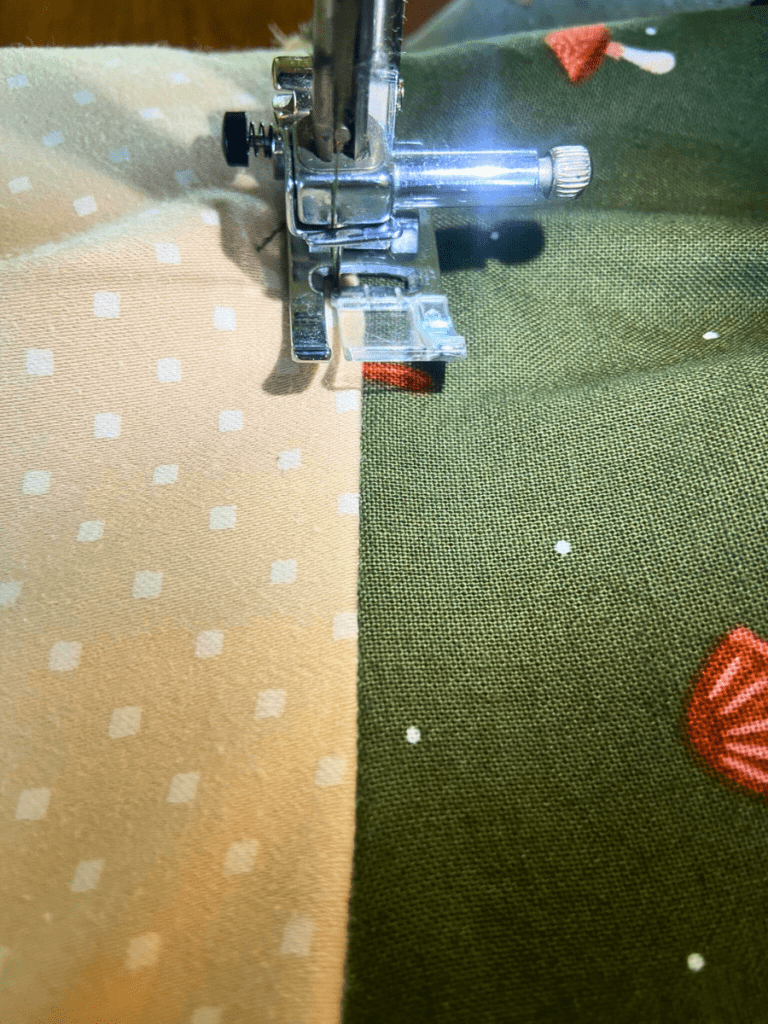
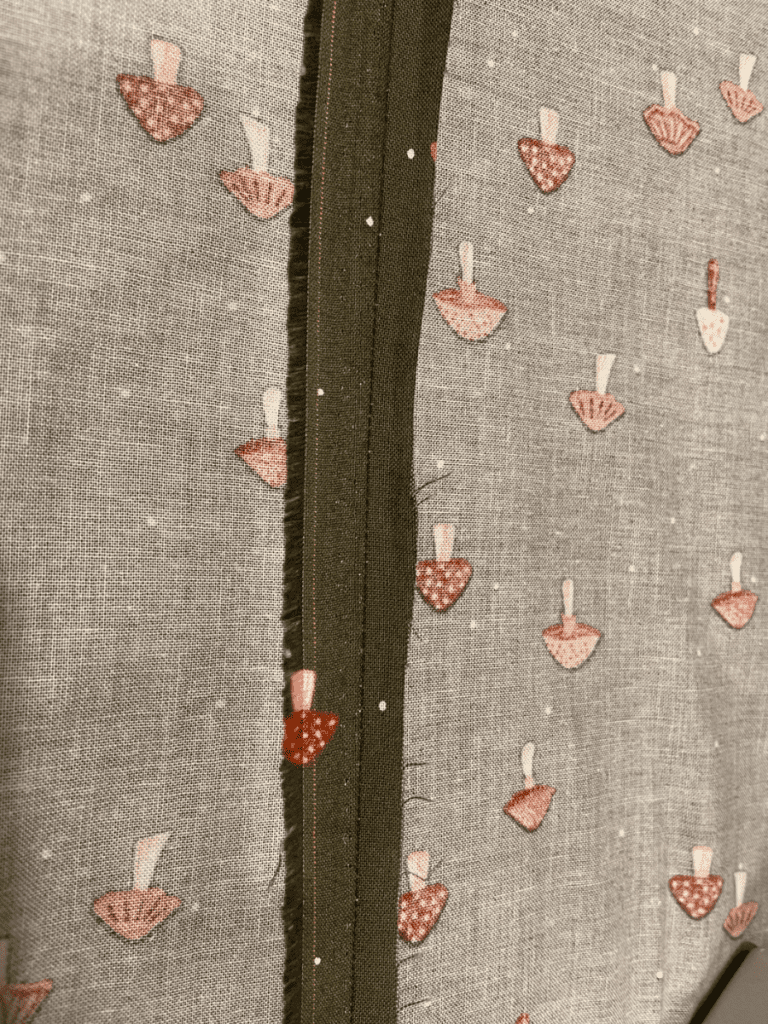
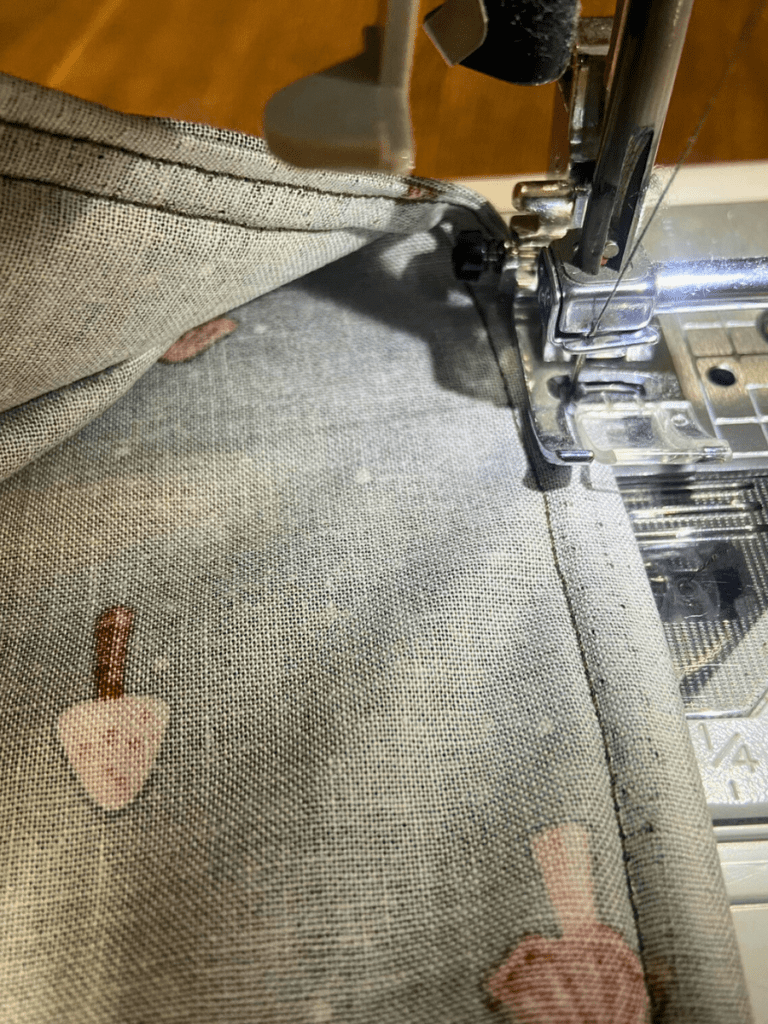
Use some mock french seams to neatly hide your raw edges of fabric and prevent them from fraying with prolonged usage of your dress!
Simply iron your seams open, fold both of your raw edges in half towards the center seam, then sandwich in half to contain your raw edges. Sew at the edge of this seam sandwich.
If this part sounds a little tricky, don’t worry. It’s not crucial to the entire structural integrity of your dress. You can use a zig zag stitch along your raw edges, use pinking shears to trim your raw edges (only at the very edge! don’t cut too close to your seams or then your dress WILL fall apart!), or just skip it altogether and accept having frayed edges on the inside of your dress. No one but you will really see it, anyway. You will get some great results taking the time to do this part, so I do encourage your to contain your raw edges somehow!
(The following pictures illustrate how to make a mock french seam on the skirt portion of the dress, but it’s the same process for the bodice of the dress, too. You’ll just have the lining to consider, too — so it’ll make a slightly bulkier process.)
Gather and Attach the sleeves
First, we’ll want to make a nice gathered, puffy sleeve (you can experiment with choosing a smaller sleeve size to have a sleeve that isn’t puffy).
Use a basting stitch on your sewing machine (my stitch length is adjusted to a 5 for this) and sew a line of stitches around the very curved portion of your sleeve. Don’t knot the beginning or the edge of your baste stitch!
Pull the thread to gather your fabric up. Line up your gathered fabric portion on the armhole of your bodice, and adjust how much gathering your sleeve has until it matches the same length, and has an even amount of gathering.
Next, we’ll attach the sleeves.
Lay out your bodice, opened with the right sides up.
Lay your sleeves right side down on your bodice, starting at the armpit portion and sew around. The more dramatically curved portion is the shoulder, and what you’ll be attaching to the armhole of your bodice.
Constantly be checking the remaining length of your gathered sleeve as you are attaching it to your bodice, and adjust with more or less gathered fabric as you go.
Repeat for both sleeves.
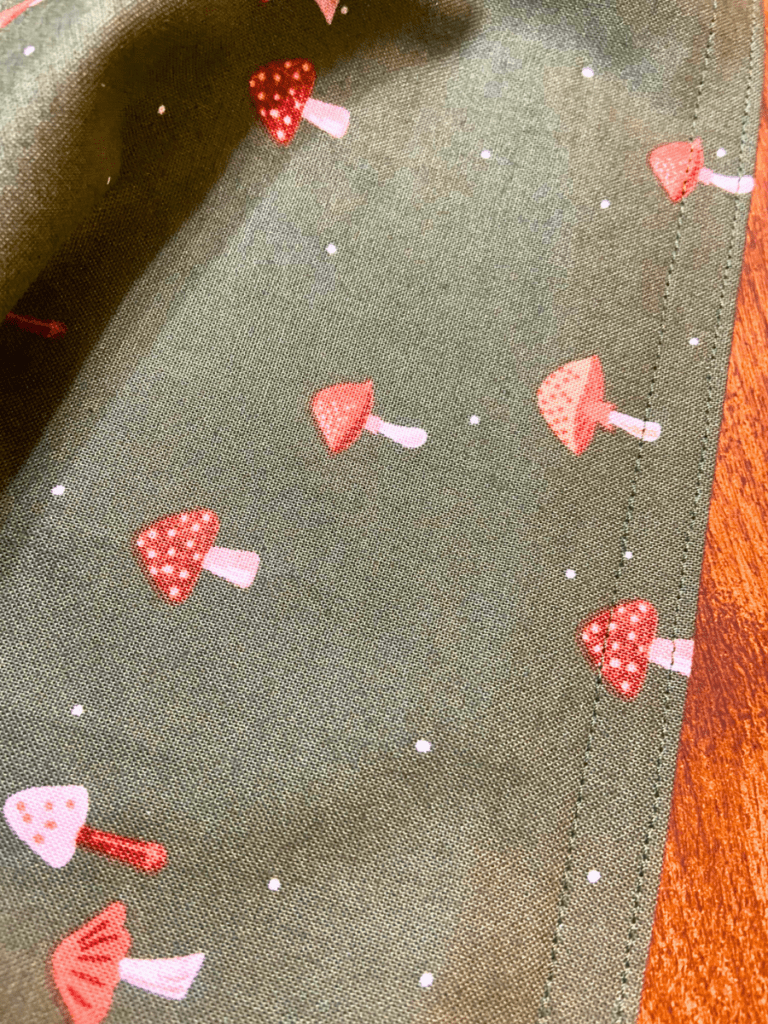
Step 5: Top stitch the bodice
Let’s take a quick moment to top stitch your bodice.
Your top stitching will provide a little extra strength to your garment, and help it lay flat between washes.
You can also take this opportunity to really make it your own with some different looks — consider using fun bright colours for your thread for a pop of color! Or, choose a thread that matches your fabric and blends in well!
Switch your seam length to 3.5mm. A slightly longer stitch length will help your top stitches look straighter, and saves on thread usage.
Sew two lines of top stitches around the front seams, neck, and sleeves of your fabric.
Start at the bottom of your front bodice and sew as one continual line of stitches all the way around the neck and back down to the other half of your front bodice. Sew this same way for your second row of top stitching. Your sleeves will have to be sewn as a separate row of stitching — you can’t connect your front/neck top stitching to your sleeves.
Sew your first round of top stitches with a 1/8″ seam allowance. Sew your second row of top stitches with a 1/2″ seam allowance.
Lastly, in preparation for attaching the skirt, you want to overlap your front bodice pieces by about an inch, and sew them in place at the very bottom.
Step 6: The Skirt
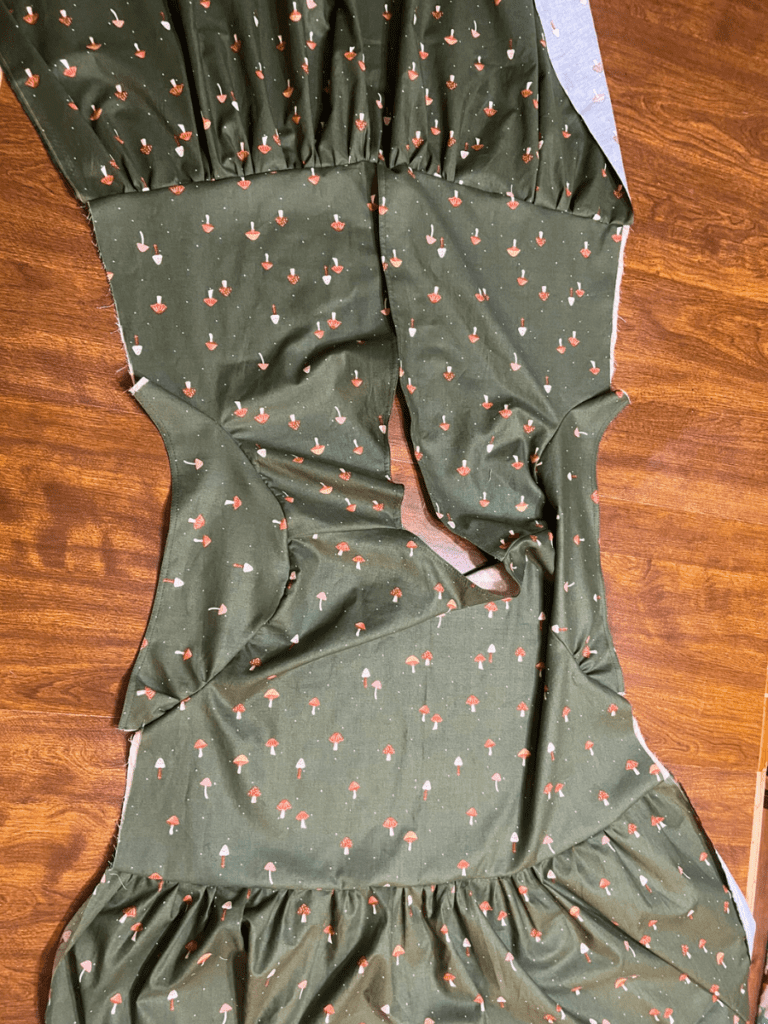
As I’ve mentioned before, there’s no paper pattern to print and cut out for the skirt.
The skirt is really easy.
It’s just a rectangle that’s gathered and attached to your bodice.
Measure your waist, and at least double it.
If you don’t have a measuring tape, or if you’re making this as a surprise gift for someone and don’t want to ask for their waist measurements (and let’s be honest, if you’re making this as a gift for a pregnant mama, maaaaaaaaybe asking for their waist measurement during this tender time won’t be taken so kindly by them), it’s easy to get a measurement without a number.
Just line up your skirt fabric to the bottom of your front bodice, DOUBLE that width, and cut to the desired length. Repeat for your back skirt panel.
Side note: Not enough fabric for one singular panel piece? No worries. Just make 2 or more equally sized panels for the front portion and the back portion to adjust for the length you need. Again, just be sure that each panel is the same size as the other skirt panel pieces, otherwise it’ll look a bit wonky.
You can make your skirt any length you want it to be — go for a shorter style, or make a maxi boho dress! The pattern is free and can be used over and over again, so make a variety of lengths in different fabrics and you’ll have a complete handmade maternity wardrobe!
To attach your skirt to the bodice, gather your front skirt panel to line up as the same width as your front bodice. With right sides together, sew to the bottom of the front bodice with a 1/2″ seam allowance. Repeat for the back skirt panel when attaching it to the back bodice.
Step 7: Finish your dress
Now, you should have a mostly finished dress.
Fold your dress in half, right sides together.
You’re going to sew each side seam in one go.
Use a 1/2″ seam allowance.
Start at the edge of the sleeve, sew along the sides of the bodice, all the way down to the bottom of the skirt.
Repeat for both sides.
Enclose your inner raw edges, either using a mock french seam, or one of the alternative methods I mentioned above.
Hem the bottom of your skirt by folding the fabric over twice to fully enclose all of your raw edges. Make two rows of top stitches for your hem — one that’s 1/8″ away from the bottom of your dress, and one that is 1/2″ away from the bottom of your dress.
Lastly, attach some buttons and button holes to the front of your dress! Easy nursing accessibility!
I truly hope you enjoyed this dress pattern. I put a lot of love into it! I hope it quickly becomes your most lovely dress of this summer!
Please sign up for emails if you’d like to stay in touch — keep an eye out for new patterns! I’m so excited to start releasing an entire line of 100 per cent free clothing patterns for the whole family!


Hello, I would be very very grateful if you could send me dress (pregnant) pdf sewing pattern 🙂
Good morning, Rasa! To print your sewing pattern, just click on the “Exclusive Content” image under “Print your Digital Sewing Pattern.” From there, the PDF will open, ready to be printed! Have a lovely day sewing!