Free Gnome Sewing Pattern DIY Printable How to Make
I’m happy to share with you a free pattern for my favorite waldorf doll yet — a little gnome doll!

Free Gnome Waldorf Doll PRINTABLE Pattern!!
Looking for free gnome sewing patterns? Today, we’re making a gnome doll from start to finish!
This is a FREE PATTERN. I love to share free patterns with you! (especially a cute gnome pattern!)
If you’re looking for the best pattern to make a gnome that takes a little more time than a fleece gnome that is made with a hot glue gun, then good news — this pattern is completely FREE!
Waldorf doll patterns are probably my favorite to make and share! This is a great waldorf twist on scandinavian gnomes!
Today I’m sharing with you my newest creation, this darling little gnome man!
This little man measures 13″ tall without his gnome hat — 17″ to the tip of the hat!
This post includes instructions on how to make the doll body. Part 2 for this doll is all about how to make his clothes! The printable pattern includes pattern pieces for the doll AND the clothes, so you only need to download and print it once!
Turn him into a DIY Christmas gnome this holiday season by choosing Christmas fabric, and using him yearly as holiday decor!
He would make such a great holiday gnome to set under the Christmas tree this year! Handmade pieces are always so special to have, especially around the holidays!
This little guy is such a fun project. I hope you have every bit of enjoyment making your DIY gnomes as I did, and I look forward to hearing all about your little gnomes in the comment section!
Let’s get right to it! I hope you enjoy your free gnome pattern!
Happy sewing! (and be sure to check out my other original free patterns and free tutorials!)
Disclaimer: As an Amazon Associate, I earn from qualifying purchases at no additional cost to you.
Supply List:
- Cotton Interlock Fabric
- Wool for stuffing the doll and felting the face
- Unwaxed Dental Floss for shaping the head
- Felting needle kit, at the very least a single felting needle
- Mohair locks for the hair and beard
- Sewing Machine
- Needle and thread for hand sewing
- Embroidery floss and an embroidery needle for the eyes and other facial features
- Sewing Scissors
- 1 1/8″ cotton guaze tubing to make the inner head
- Straight Pins to hold the cap and hair in place while sewing onto the doll (I like long ones with the big “balls” on the end so they stay in place and don’t get lost in the doll)
- A large knitting needle or slender wooden spoon to help stuff the wool into your doll
- A crayon (I used red) to “blush” your doll with
- Permanent fabric marker with a very fine tip to draw freckles (I used black, but I feel like brown would have been better)
- 4.5mm crochet hook and worsted weight yarn to crochet a cap for the hair and beard. You’ll want a similar color to the hair/beard!
- Scraps of fabric for making his clothes.
- And, of course, you’ll want your free printable pattern included on this post! (it includes the clothing, too!)
Step 1: Print, trace, and sew your pattern pieces for the body
Let’s start working on your gnome body!
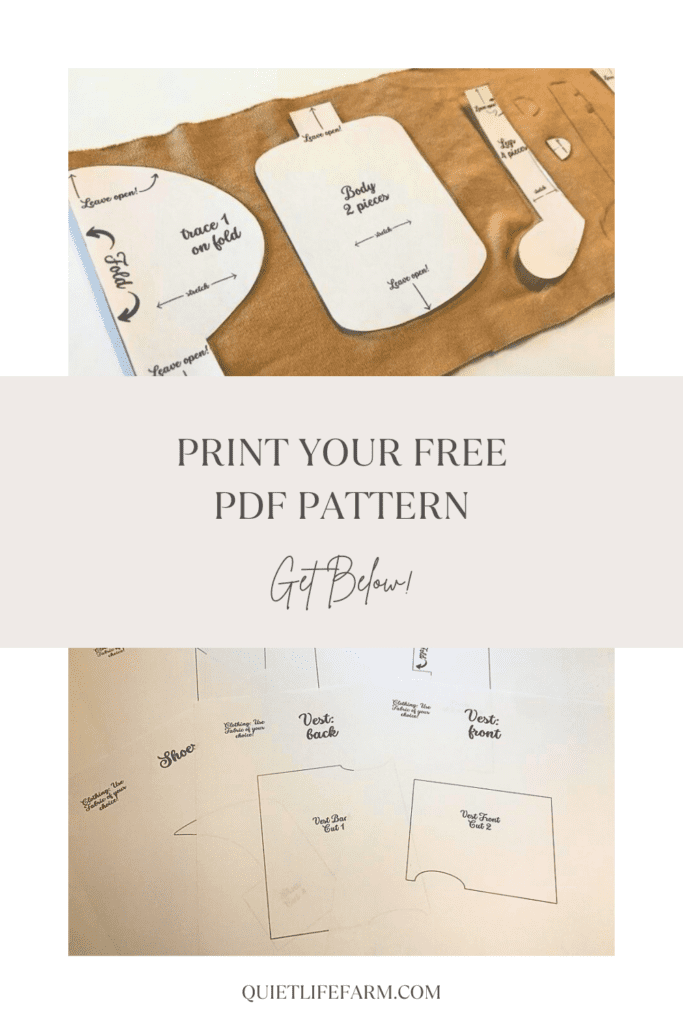
First, print your PDF pattern. These are your FREE templates!
Enter your email address and the pattern will be automatically sent to your email inbox!
Trace the pattern piece onto the fabric.
Mind the stretch, and make little marks to show which portions to keep open. This will help you remember not to sew those areas shut!
I just used a regular pencil to mark my pattern pieces.
When tracing patterns, don’t put the pattern pieces too close to each other. You’ll want a 1/4″ seam allowance around each piece (1/2″ distance between each 2 pieces).
Remember to pay attention to which direction the fabric stretches!
I put little arrows on the pattern pieces to help you determine which way the fabric should stretch. Keeping the stretch of the fabric going in the correct direction will affect the shape of your doll when you go to stuff it.
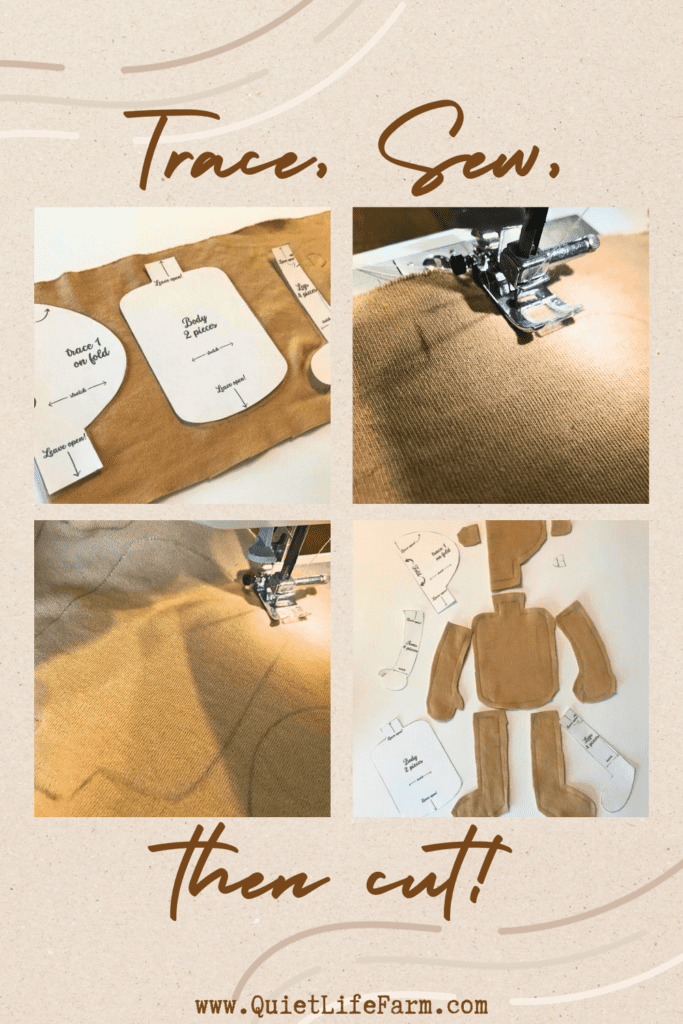
Using a thread color to match your fabric, sew onto the traced lines. Again — remember to leave marked spaces open!
Keep the top of the neck open, the bottom of the body open, the straight edge of the ears open, the top straight edges of the arms and legs open, and the top and the bottom of the head open.
You will also be keeping a small portion of the backs of the legs open! This little opening will help keep the legs nice and firm when we attach them later.
When beginning and ending lines of stitches, do plenty of back stitches. You want good strong knots so that your stitches don’t come undone when stuffing your doll, and you want the ability to really stretch the openings of the doll if you need to!
Cut out all of your pieces, leaving a 1/4″ seam allowance around all of your stitches.
Leave a 1/4″ seam allowance around all the edges you left open, too.
As you are working on your doll, it’s helpful to keep all the pieces in a bag when you’re not actively working on them. Those little ears can so easily be lost!
Step 2: Begin to stuff your doll with wool

Turn all your pieces right side out.
I used a knitting needle to help turn out the thumb and any other edges that needed a little help. Just be careful not to poke through the fabric! A larger sized knitting needle will be less pokey.
Use wool to stuff the arms. Use a knitting needle (or something similar) to carefully poke wool into the thumbs.
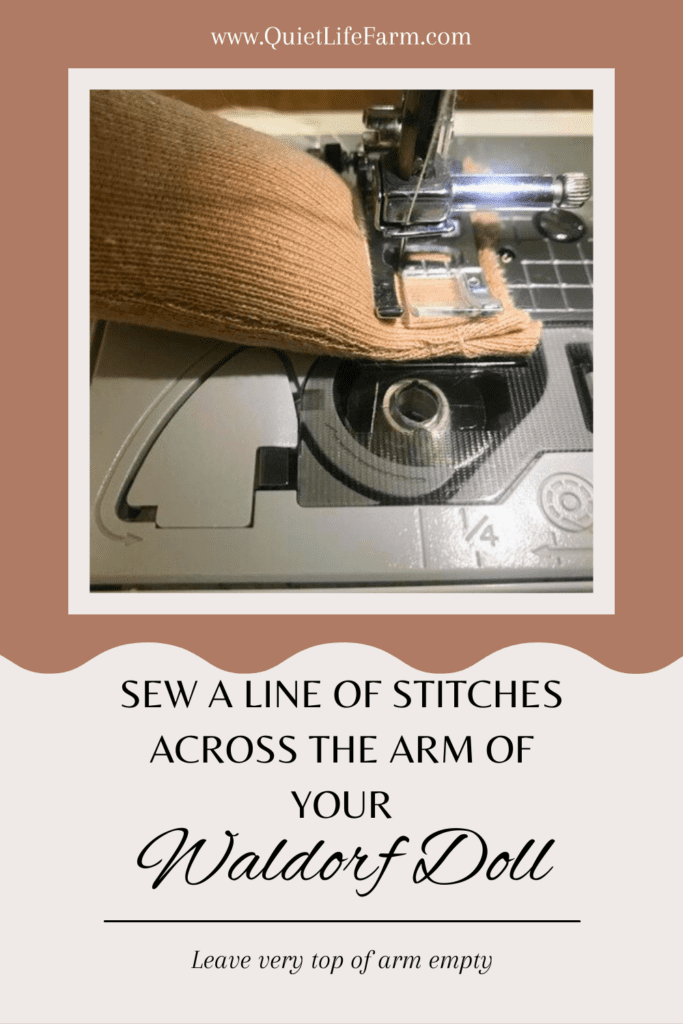
Leave about 1/2″-1″ of the top of the arm empty.
Run a line of stitches through your sewing machine (with matching thread!) to hold the wool down to the bottom of the arm.
Take out a sharp hand sewing needle.
Fold the raw edges of the arm to the inside of the arm and do a scant line of stitches, right at the edge, sewing by hand.
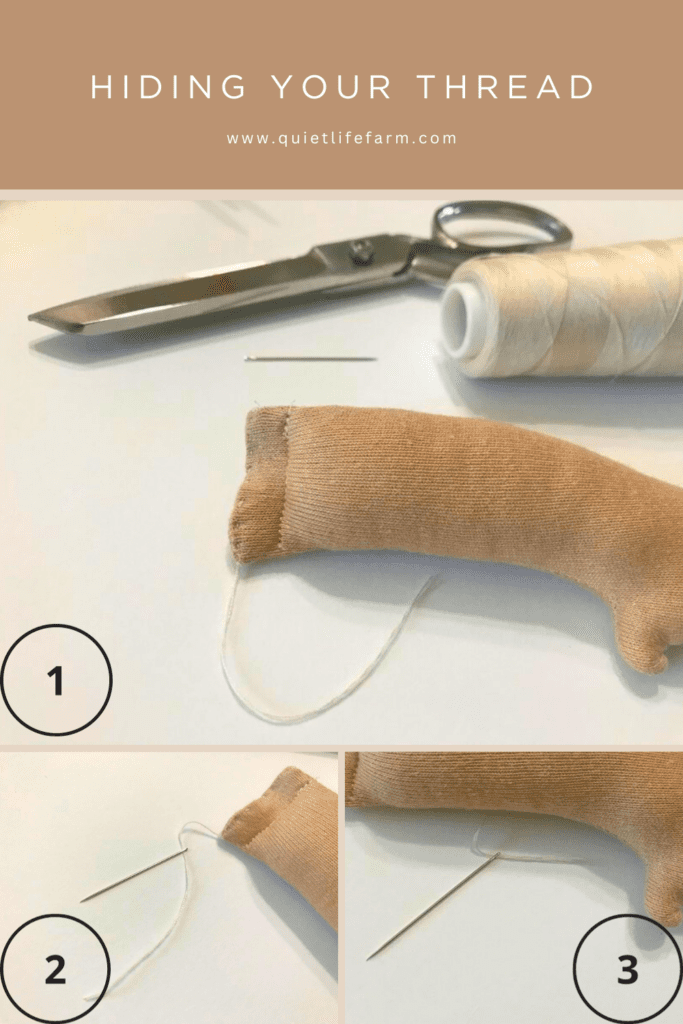
Make a knot, and use your threaded needle to hide the end of the thread into the arm, and cut the remaining end.
To hide the other tail of thread, rethread your tail end of thread at the beginning of your stitches, go into the arm and come out the other end to hide your beginning thread.
Cut any excess thread sticking out of the arm.
Step 3: The Legs
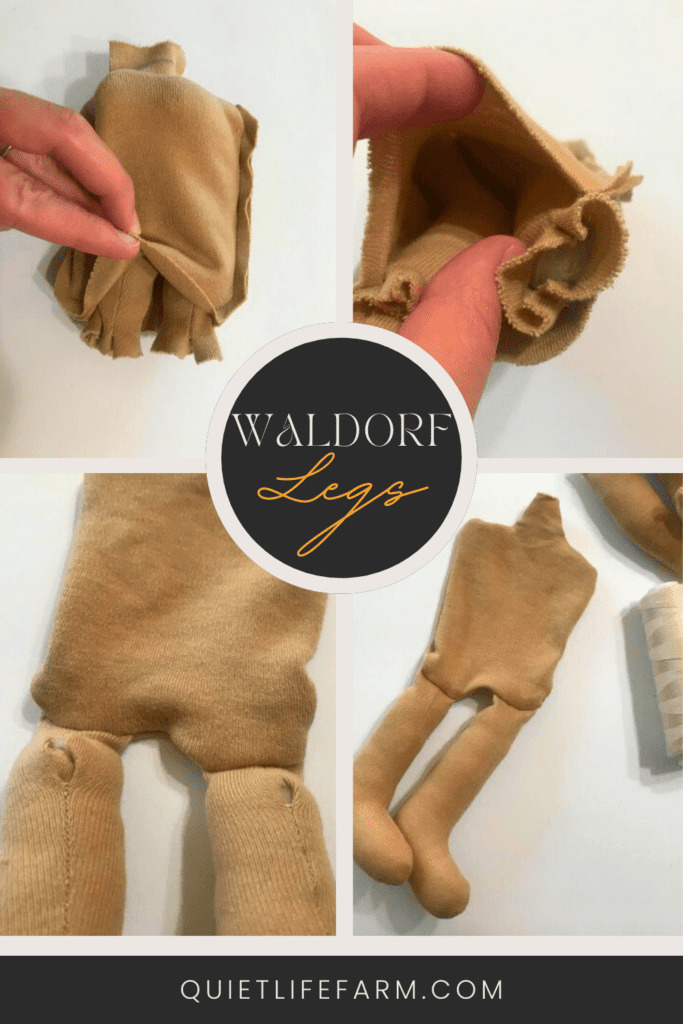
Stuff your legs up to the hole at the back of the legs. Use the larger hole at the top of the legs to put your wool in.
Turn the body piece inside out.
Stick the stuffed legs inside the torso, making sure your feet are facing the same direction!
The feet will be at the shoulders!
Line your legs up neatly and pin them into the place.
Sew a line of stitches across the bottom of the torso, closing everything in.
Be sure to start and end your stitches so that they will line up with your existing side stitches on the torso.
Stay on the line you traced with your pattern!
Pull the legs carefully out of the neck hole so the torso is right side out again — this time with its legs attached!
Pull one leg out at a time — both will not fit at the same time!
Use the holes on the back of the legs to add more wool to the legs until the legs are firm.
Then, hand sew a ladder stitch to close the hole.
Tuck your ends of thread deeply in the body, just like I demonstrated with the arms.
Step 4: Make the Inner Head
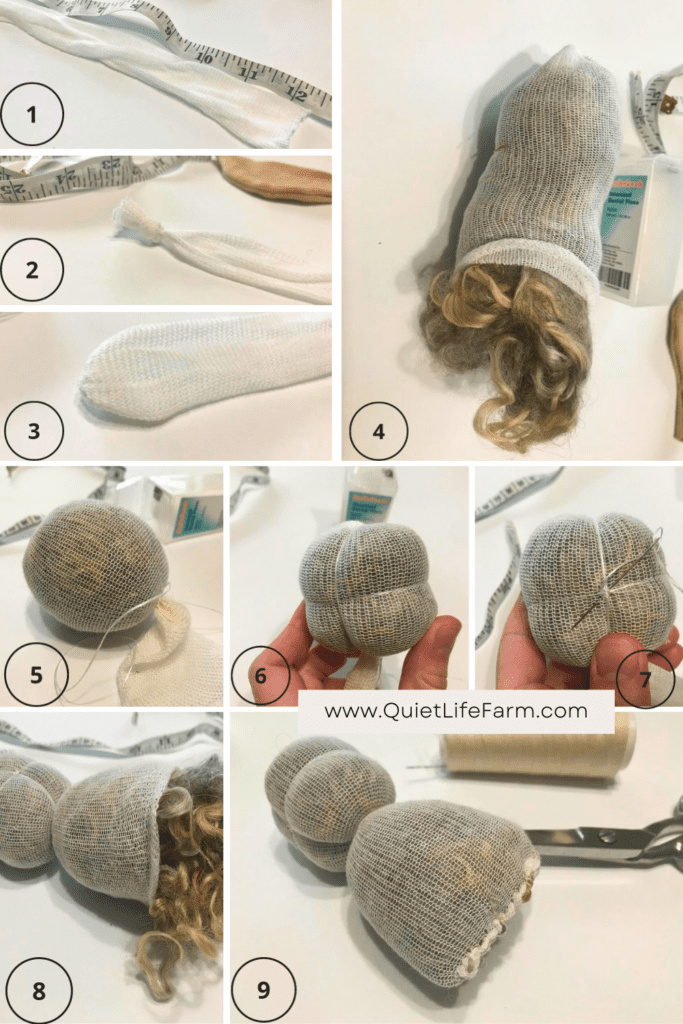
Next, take 12″ of 1 1/8″ cotton gauze tubing and make a knot at the top.
Turn it inside out.
At the knot end, stuff wool and make a FIRM round head until the head measures 7″ around in all directions.
Take some unwaxed dental floss and wrap it around the center of the head.
Make a tight knot, then wrap around the center of the head from top to bottom to divide the head into four separate parts.
Weave all the ends of the dental floss into the head, and sew the intersections of where the floss makes an “X” into place so that they do not shift.
Stuff the neck with wool. Sew the bottom closed.

Felt the bottom front portion of the face with wool.
Use a single felting tool to felt the wool to the eyeline and to the edges where it meets the dental floss.
Use the multi felting tool to smooth and firm the wool out. (you can do this part with a single felting tool if that’s all you have, it will just take longer.)
Take little bits of wool and add it to the face to felt a chin and two cheeks.
Use wool and your felting tools to create a nice large nose and two lips, too.
Step 5: Assemble the Rest of Your Gnome Doll
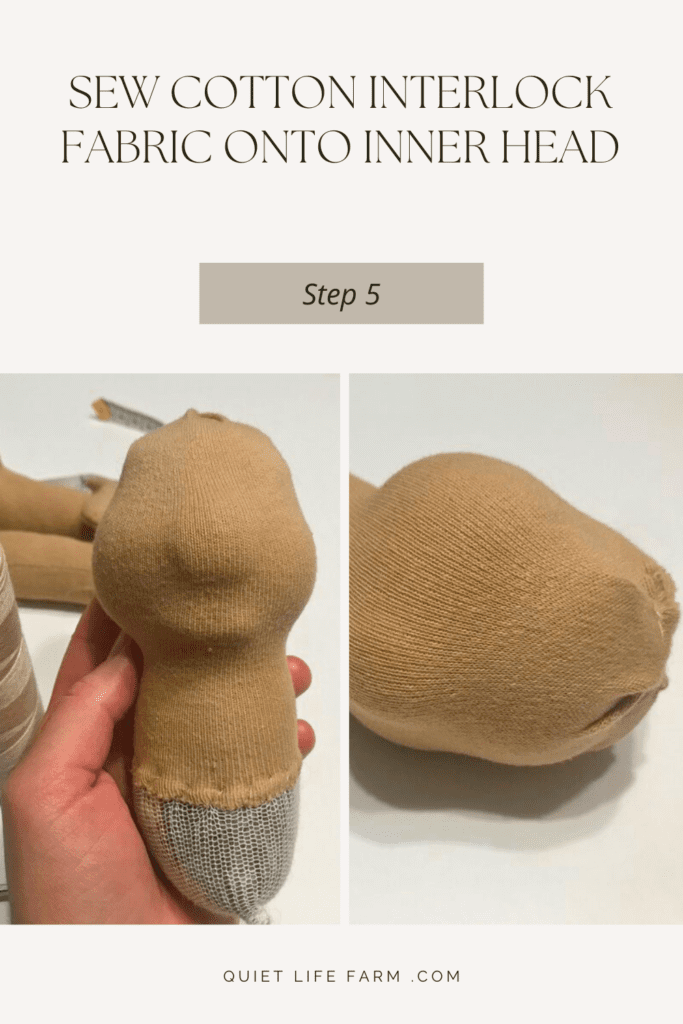
Stick the neck through the top hole on the head piece.
Pull the head fabric over the sculpted head, making sure the seam is on the back of the head.
Pull the neck fabric on the head piece down over the neck and sew it firmly into place, making sure there are no wrinkles.
Then sew the top of the head closed, keeping it shaped closely against the head.

Stuff the body, leaving an empty space in the center.
If you wish to add weight to your gnome, do this before stuffing the body. Sew a small bag of poly pellets and place inside your gnome’s rump before stuffing the body with wool. It’s a great way to help him sit up when he’s complete!
Stick the neck into the body.
Stuff any extra wool into the shoulder as needed.
Use a ladder stitch to sew the head/neck to the body.
Using a ladder stitch, attach the arms to the shoulders.
Hide the ends of the thread inside the body, and cut the remaining tails of thread off.
The thumbs should be facing forward. Use a ladder stitch on top of the arm, and under the arm.
I like to go around the arm a second time — this makes the stitches look extra neat.
Step 6: Embroider the Face on your gnome

Next I embroidered the face.
Take pins and place them where you’d like to have the eyes.
I like to look at how each eye lines up with each other, with the cheeks, with the nose and lips… this helps get the eyes as even as possible.
Once I decided where to put the eyes, I traced around the pin withe a pencil, making a nice round circle.
Then, I picked a green embroidery floss for his eyes — then stuck a long needle straight into his back of his head.
I then rethreaded the needle with the long embroidery floss still sticking out the front of his eye.
I embroidered his eye by going from the right to left, right to left — making stitches this way, all around the pencil mark I traced.
Then, I stuck the needle all the way back to the head, coming out close to where my initial stitch was. Tie a knot tightly to make the eyes go back into the head a bit.
I chose a separate color and embroidered some eyelids on top of the eyes, in the same way I embroidered the eyes, tying the floss in the back of the head.
I just did one stitch straight across for his eyelids.
For the mouth, I also did one long stitch, but I pulled the mouth VERY tightly in the back so it would be nice and indented.
Tie knots with all the embroidery thread ends hanging out of the back of the head to secure them.
Then weave them into the head and cut off the excess.
It’s okay for the back of the waldorf head to look unattractive. It will be covered by hair and by the bottom of the hat.
Step 7: Crochet the Cap

Next I crocheted the cap for the doll.
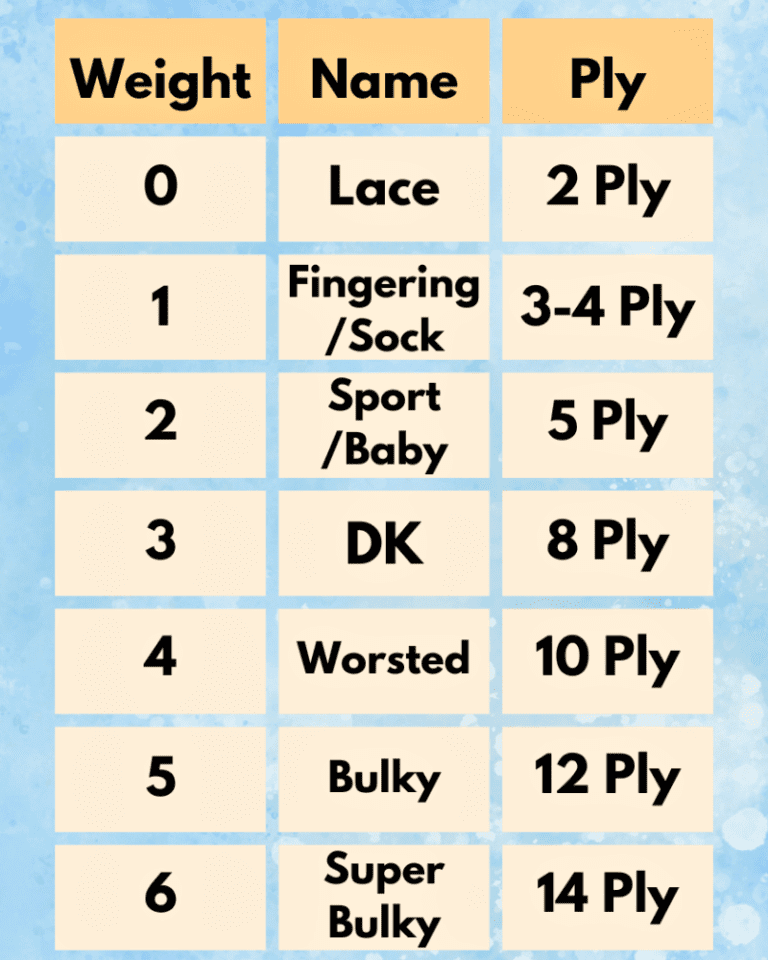
I chose a worsted weight (weight 4) wool yarn that matched the color I planned to use for his hair and beard.
I used a 4.5mm crochet hook.
Chain 4, and slip to join, making a “circle.”
Round 1: Into the center of your “circle,” make 8 double crochets. Slip to join (and continue to slip to join at the end of every round).
Round 2: Chain 1. Make 2 double crochets into every stitch.
Round 3: Chain 1. (1 Double Crochet into first stitch, 2 Double Crochet into the next stitch) repeat all the way around. Slip to join.
Round 4: Chain 1. (1 Double Crochet into the next two stitches, 2 Double crochets into the third stitch) repeat around. Slip to join.
Next row: Chain 15. Count a distance of 16 stitches away from the final stitch of round 4 (the same stitch the chain of 15 chains is coming out of), and slip to join in that 16th stitch. You should have a little flat “basket.”
Next, chain 1, and do a row of single crochets across your 15 chains. Slip to join, tie and cut your yarn.
Lay your cap over the head.
The row of 15 chains should be over the chin on the face, and the distance of 16 stitches the chain is attached to should be on the bottom half.
The “long half” of the cap should be on the top half of the head.
Step 8: Attach the Hair and Gnome Beard

Attach the hair by going in circles around the cap.
For the first round, attach the hair UNDER the cap, sandwiched between the head and cap.
Pin it into place, then sew through the head, hair, and cap.
I made a shorter hair weft for the hair, and a long weft for the beard. For a more detailed tutorial on how to make a weft, I have a detailed post HERE.
Remove the pins, and take a dollmaking needle to sew stitches all over the cap to secure it to the head.
Then, continue sewing the hair in circles going towards the center. Cut off any remaining weft and use your needle to sew your ends of thread into the head where they won’t be seen.
Next, we’ll do the beard!
I chose a nice long weft for his beard.
For your first round of beard on the doll, sew it UNDER the row of 15 chains that are going across the face.
Work your way up the row of 15 chains, adding layer by layer until you’re satisfied with how full the beard is, and attach the final row to the top of the beard.
You can also use faux fur if you don’t want to use wool!
Step 10: Adding the Final Details to your Gnome

Next, make a belly button!
Stick the needle in and out at a distance of a bit wider than you want the belly button to be.
Continue going in and out along the edges of a nice even circle, pulling tightly to pull a raised “bump” for a belly button.
As you weave your needle in and out, try and pick up bits of wool from in the belly and bring them to the top to add bulk to the belly button.
Once you’re happy with your belly button, weave your needle in and out to right next to your first stitch, tie a knot with your working thread and beginning thread tail, then weave both ends of thread into the body before cutting them short.
I decided to use a super fine permanent marker to give my little man some freckles right on the upper cheek line.
I used a black marker, but I feel like it would have looked better if I used a brown marker.
But — black was all I had!
Then, I used a red crayon to blush the doll.
I blushed his whole face very lightly, then put a little more pressure on the crayon to create more visible blush around the cheeks, cheekbones, and mouth.
I also blushed the hands, knees, torso, and elbows.
Once your face is completed, it’s time to use a ladder stitch to sew on your ears!
I like to blush my doll FIRST so the ears don’t get in the way and I can be sure the face looks exactly as I want it to.
Fold your raw edges into your ears.
Stuff a little wool into the ears until they’re nice and firm.
I carefully used a large knitting needle to help stuff the wool evenly into the ears.
Then (again, using a ladder stitch — it makes your stitches look SO neat when attaching doll extremities!) attach the ears to the face.
Conclusion and Gnome Clothes

This concludes the tutorial for how to make your own swedish gnome doll!
If you want to make the clothes next, I have a pattern/tutorial for that HERE.
I love sharing free Waldorf doll patterns with you, making Waldorf dollmaking accessible to everyone and every budget! In fact, I love to share easy sewing projects of all kinds with you!
If you’re interested in more Waldorf Doll patterns, please take a while to explore my website. I have everything from knitting a Waldorf Bunting Doll, to making a Waldorf Doll out of a sock and wool dryer ball! Be sure to check out more easy free sewing patterns! I strive to make great tutorials with each on!
Please leave a comment down below if you enjoyed this pattern. I’d love to hear from you, and would love to hear all about your very own gnome you made!